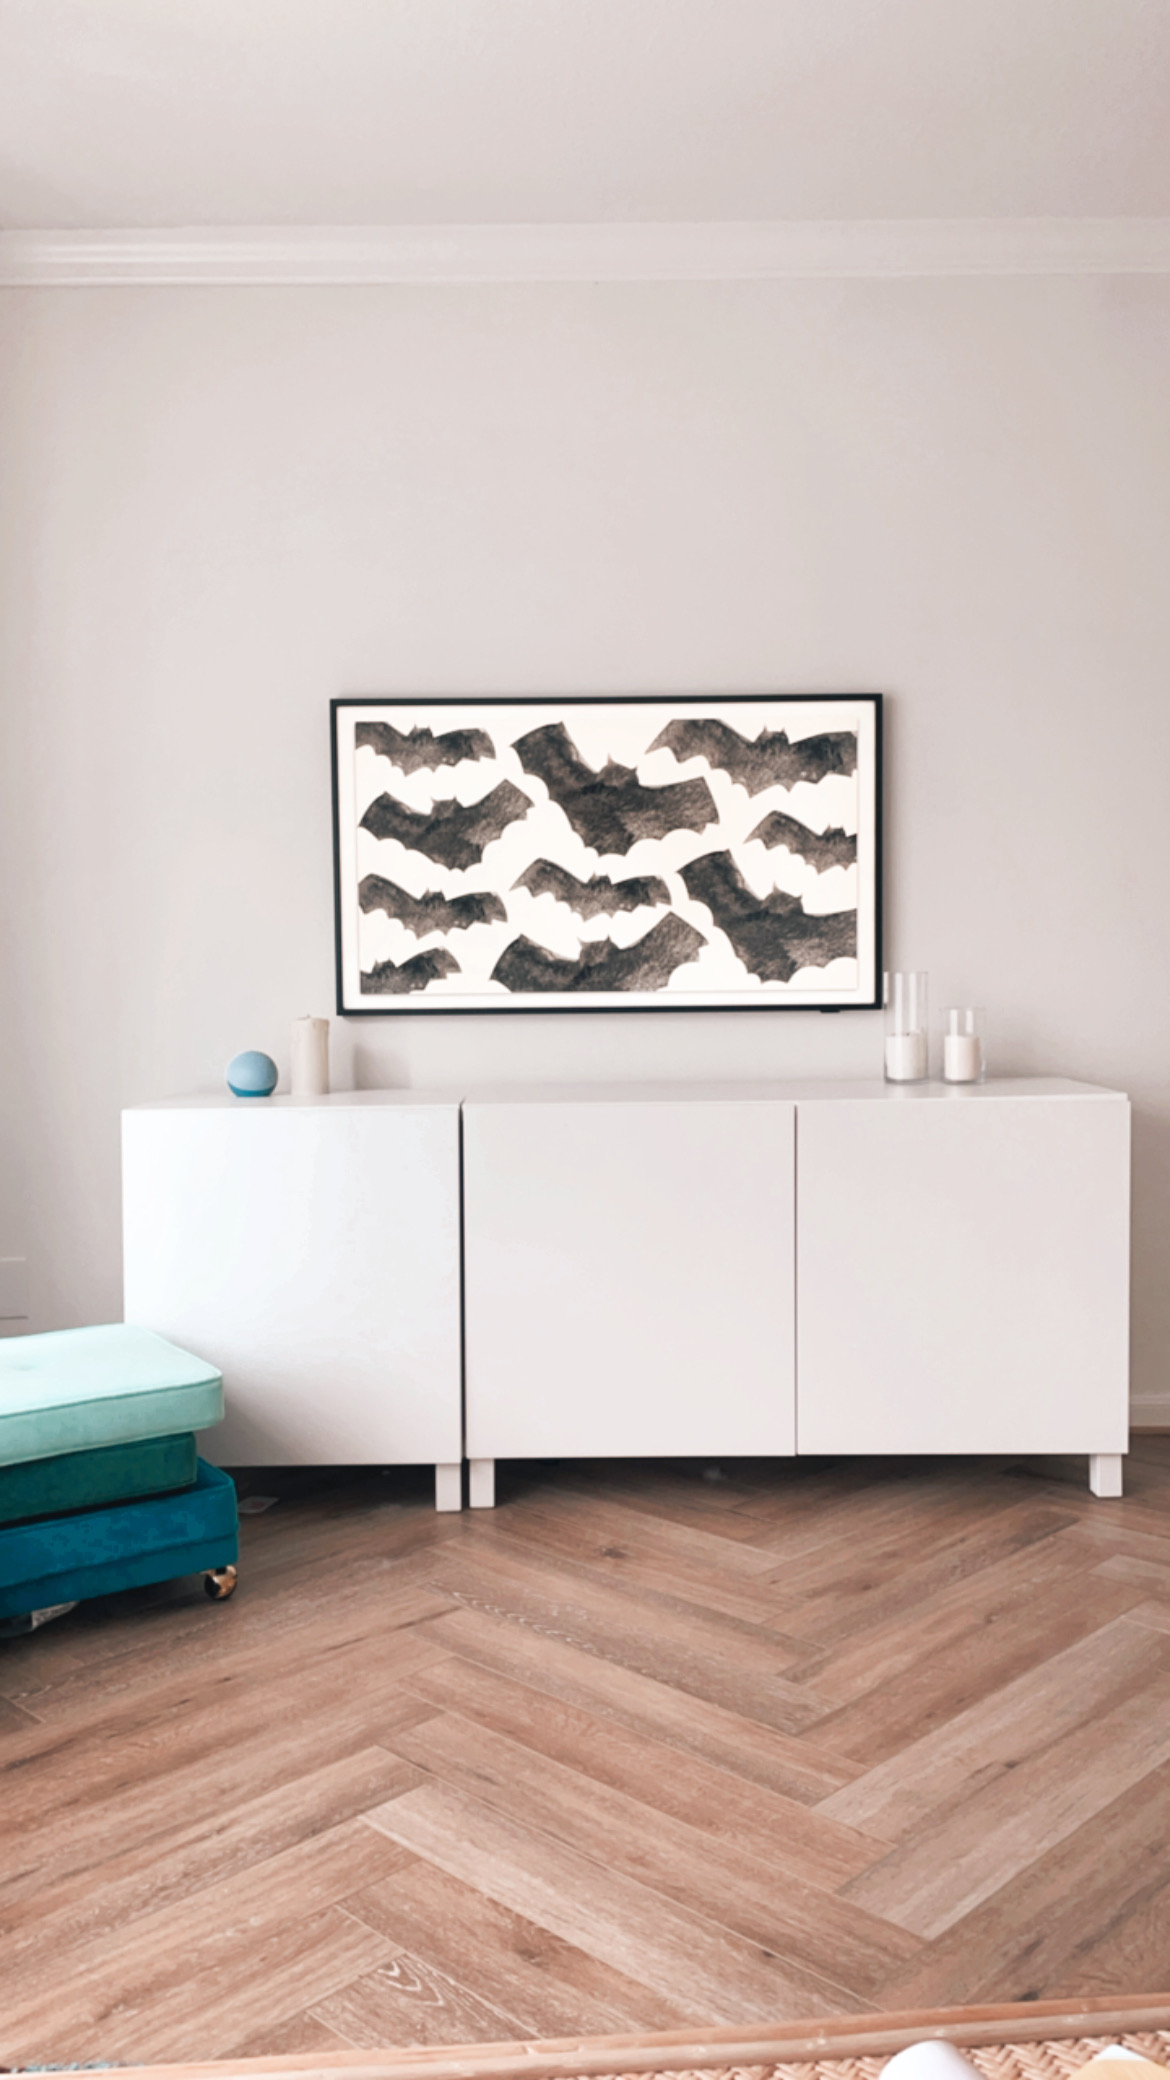
It took me a while before I finally caved and bought a Samsung Frame TV, but I have always had a hard time figuring out how to make a tv look aesthetic and this was honestly a pretty great solution!
We have the 50 in. Samsung Frame TV. This is what it looked like when we first got it. Originally I was going to do the basic frame that you can purchase on their website, but I decided to go for something a little more show stopping.
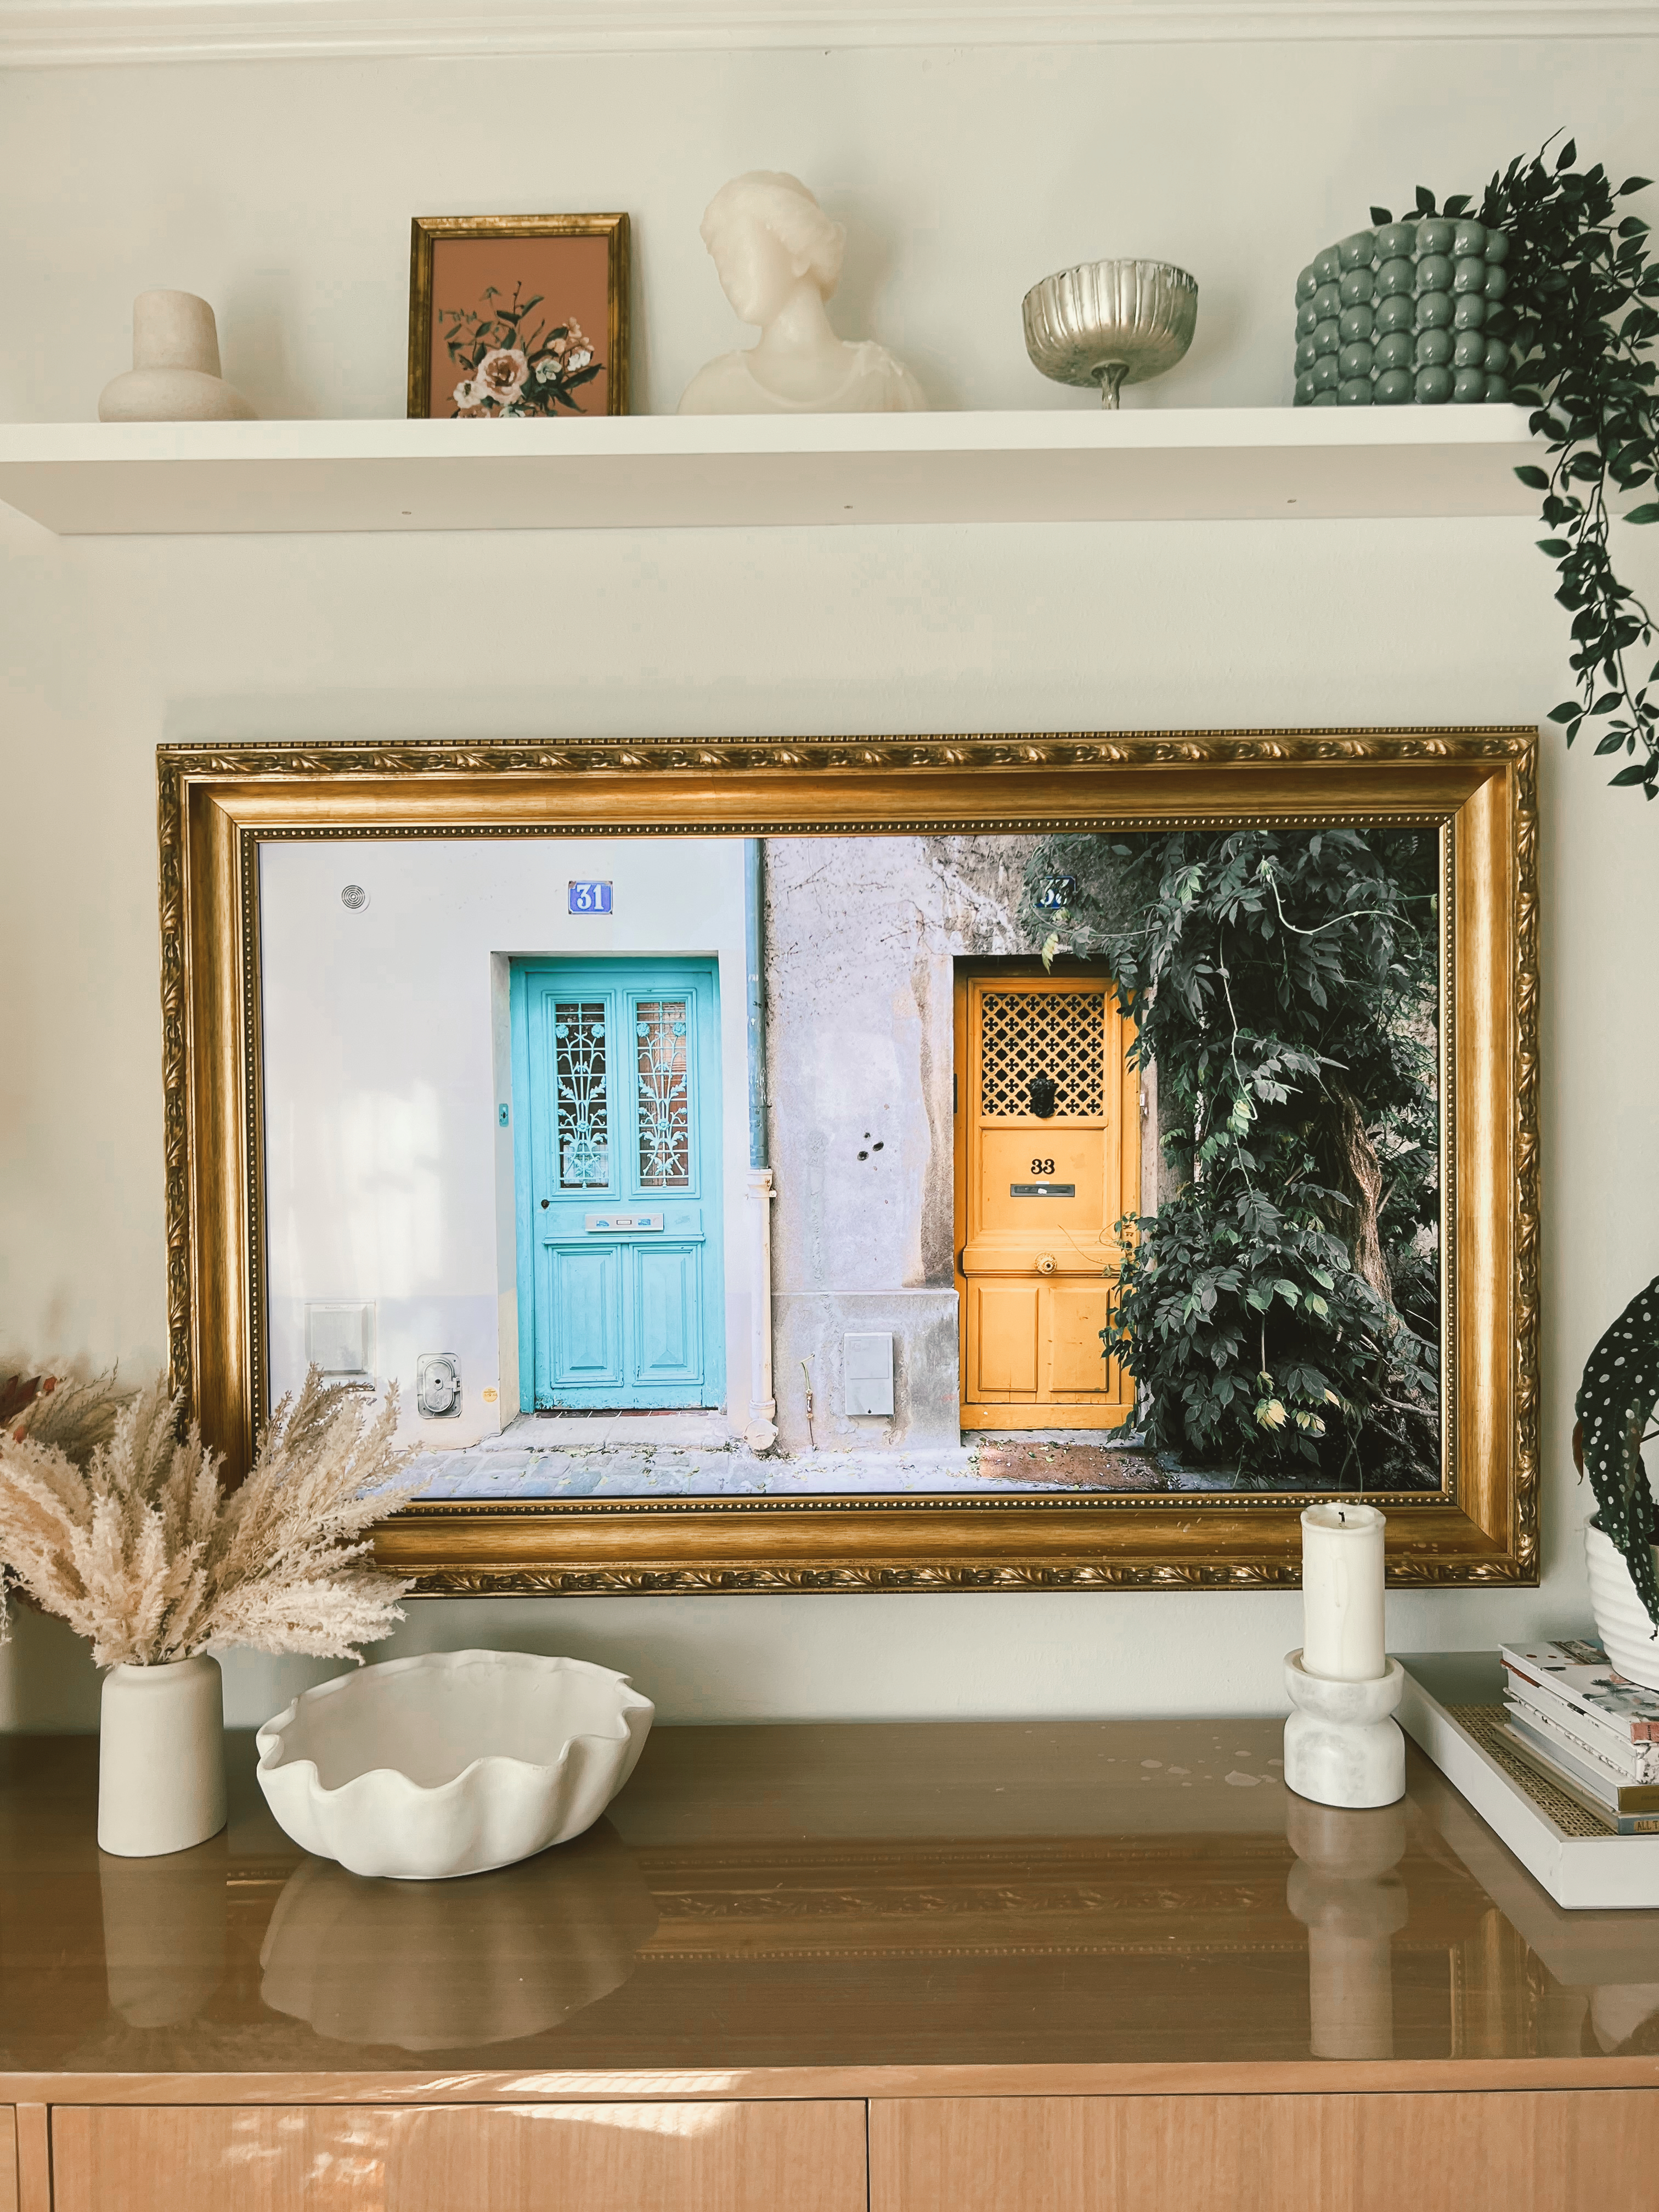
One of the popular frame tv frame makers is Deco TV Frames. We went with the Ornate Gold Frame , which I just love! It makes such a big impact. They also have a lot of other pretty frames to pick from! If you want to see how other frames look in real life, definitely check out their Instagram.
I’ve also seen a lot of really great DIY frames so if you’re looking for a budget-friendly option, I would definitely look into that as well! Feel free to drop any questions and I’d love to answer them as best as I can!
When I was a teacher, the most memorable gift I received was a stovetop potpourri jar! It was so sweet and thoughtful and smelled amazing! The holiday’s can get expensive so this is a great option for gifting on a budget! You can download the gift tags by clicking here!
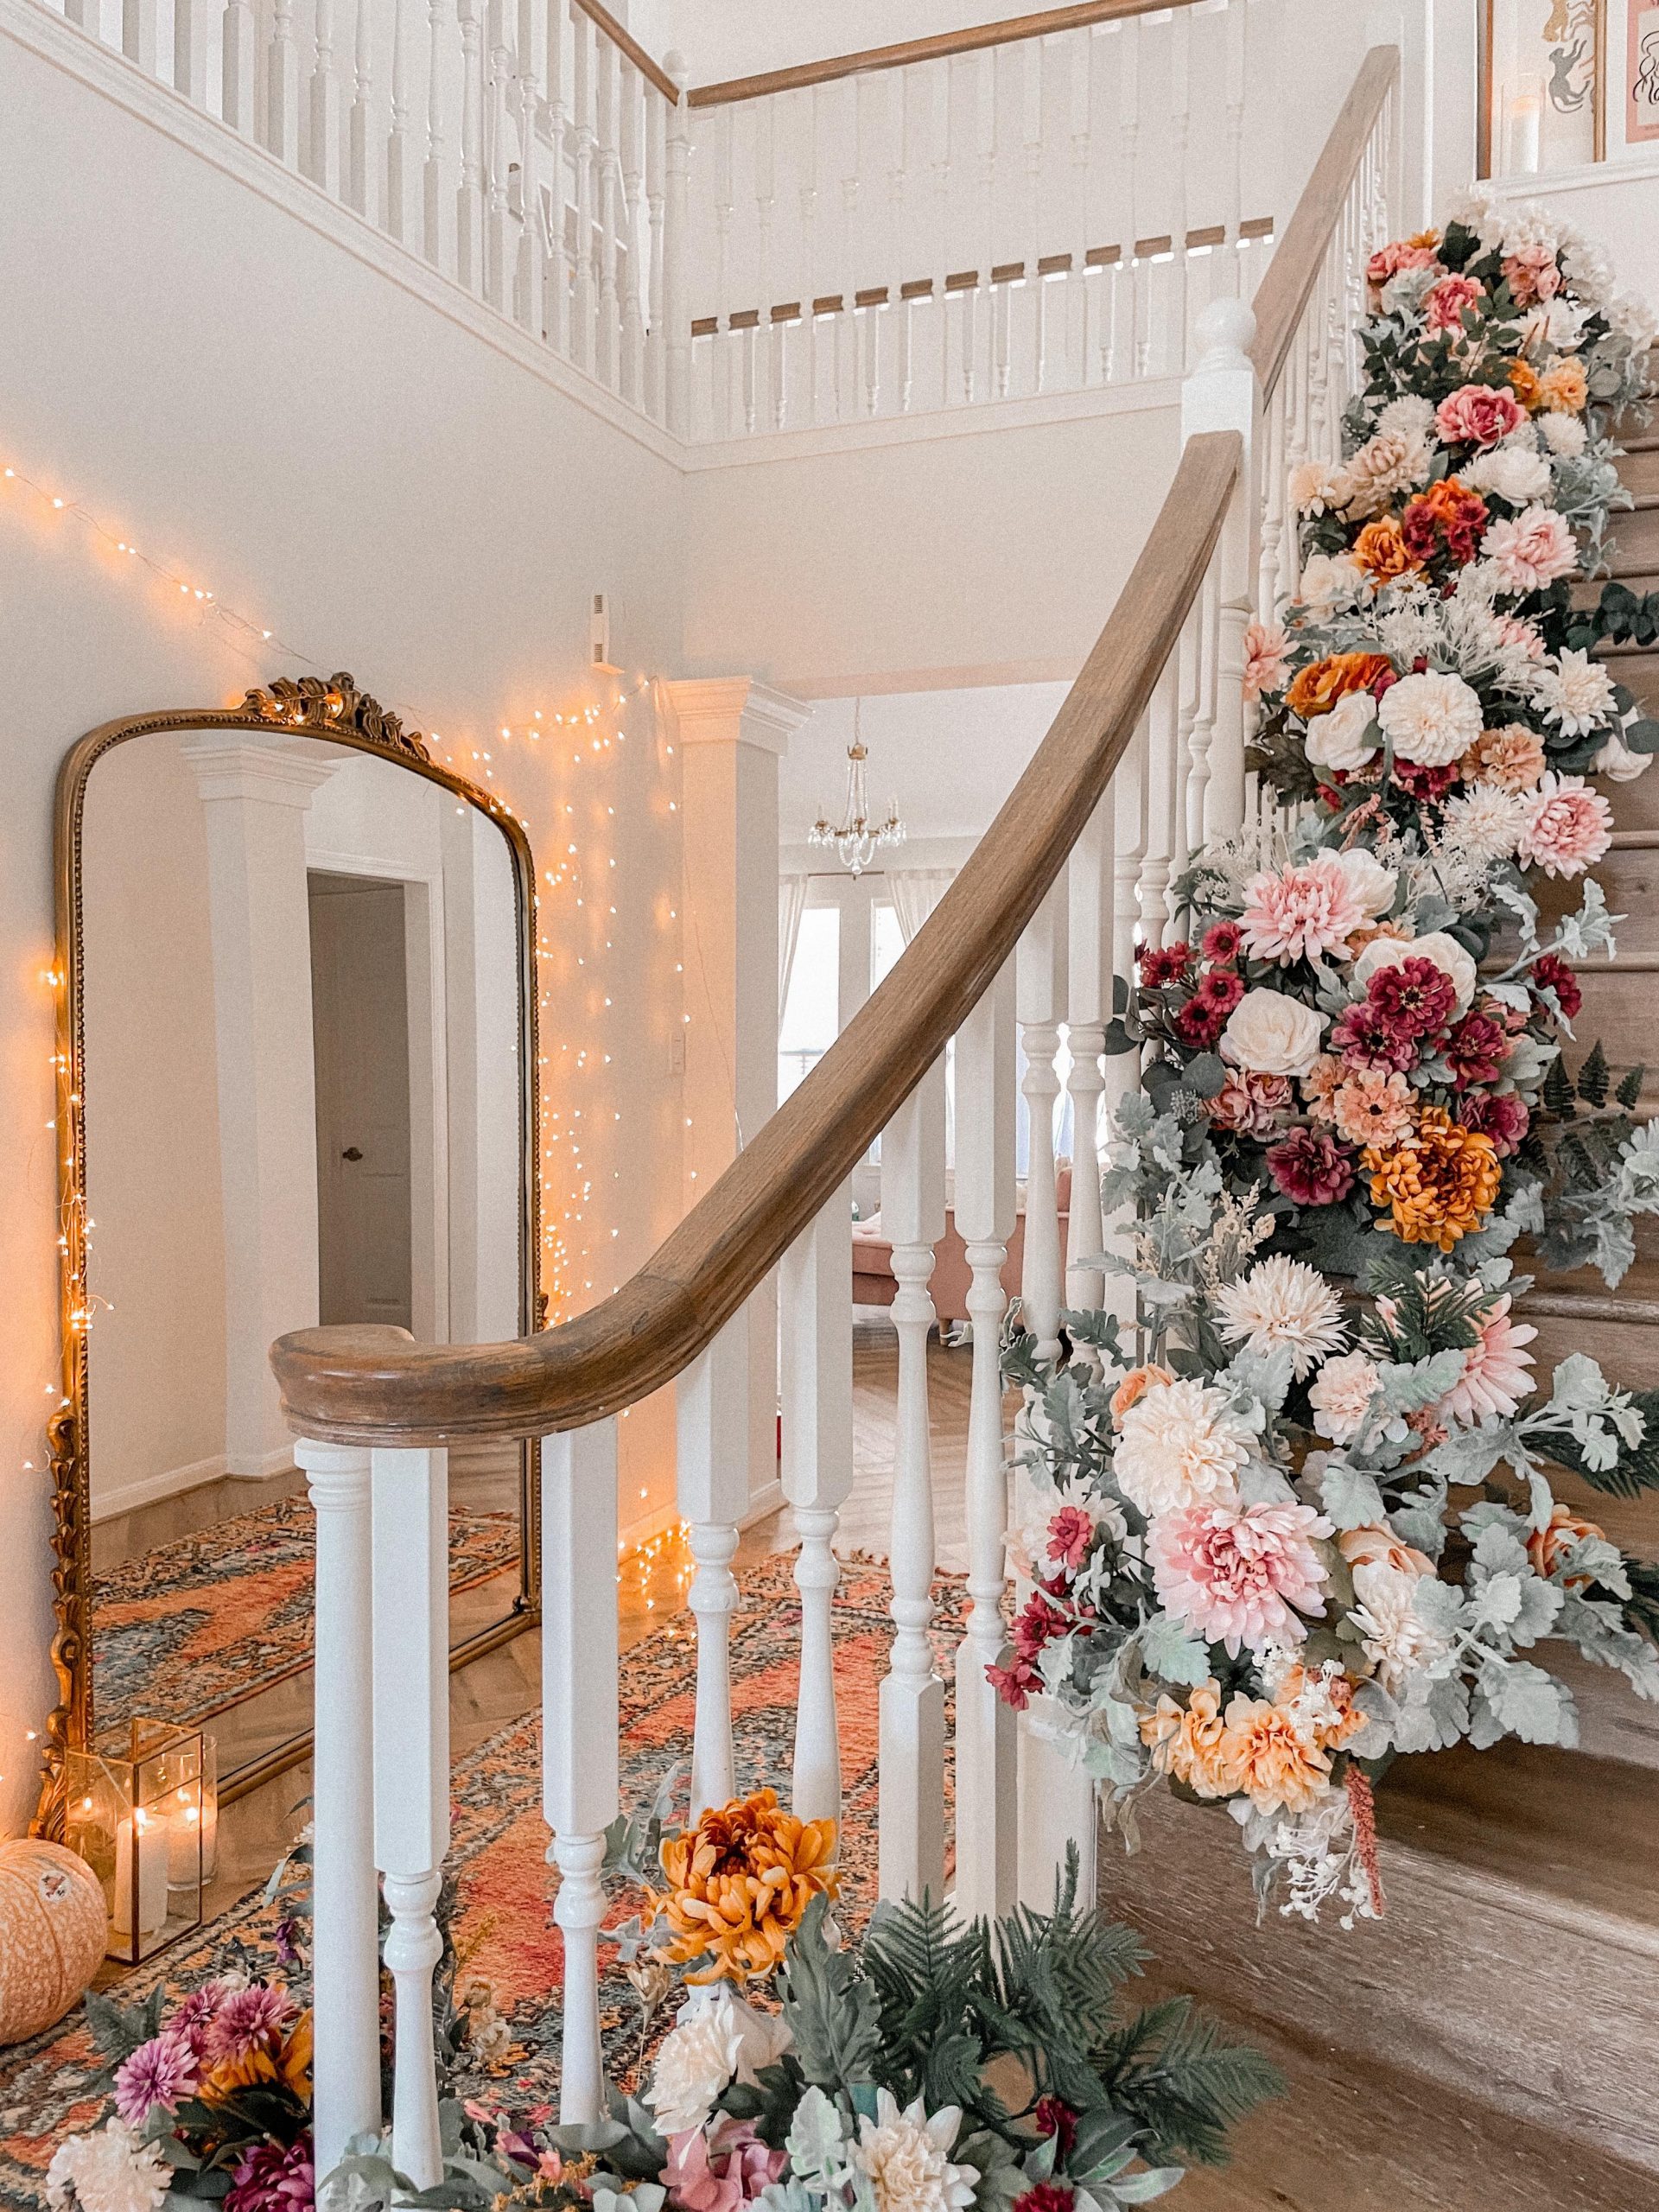
This fall floral DIY was shockingly super easy! It takes a lot of time to put together, but the final result is so worth it! You will need faux florals, floral foam, wire cutters/scissors
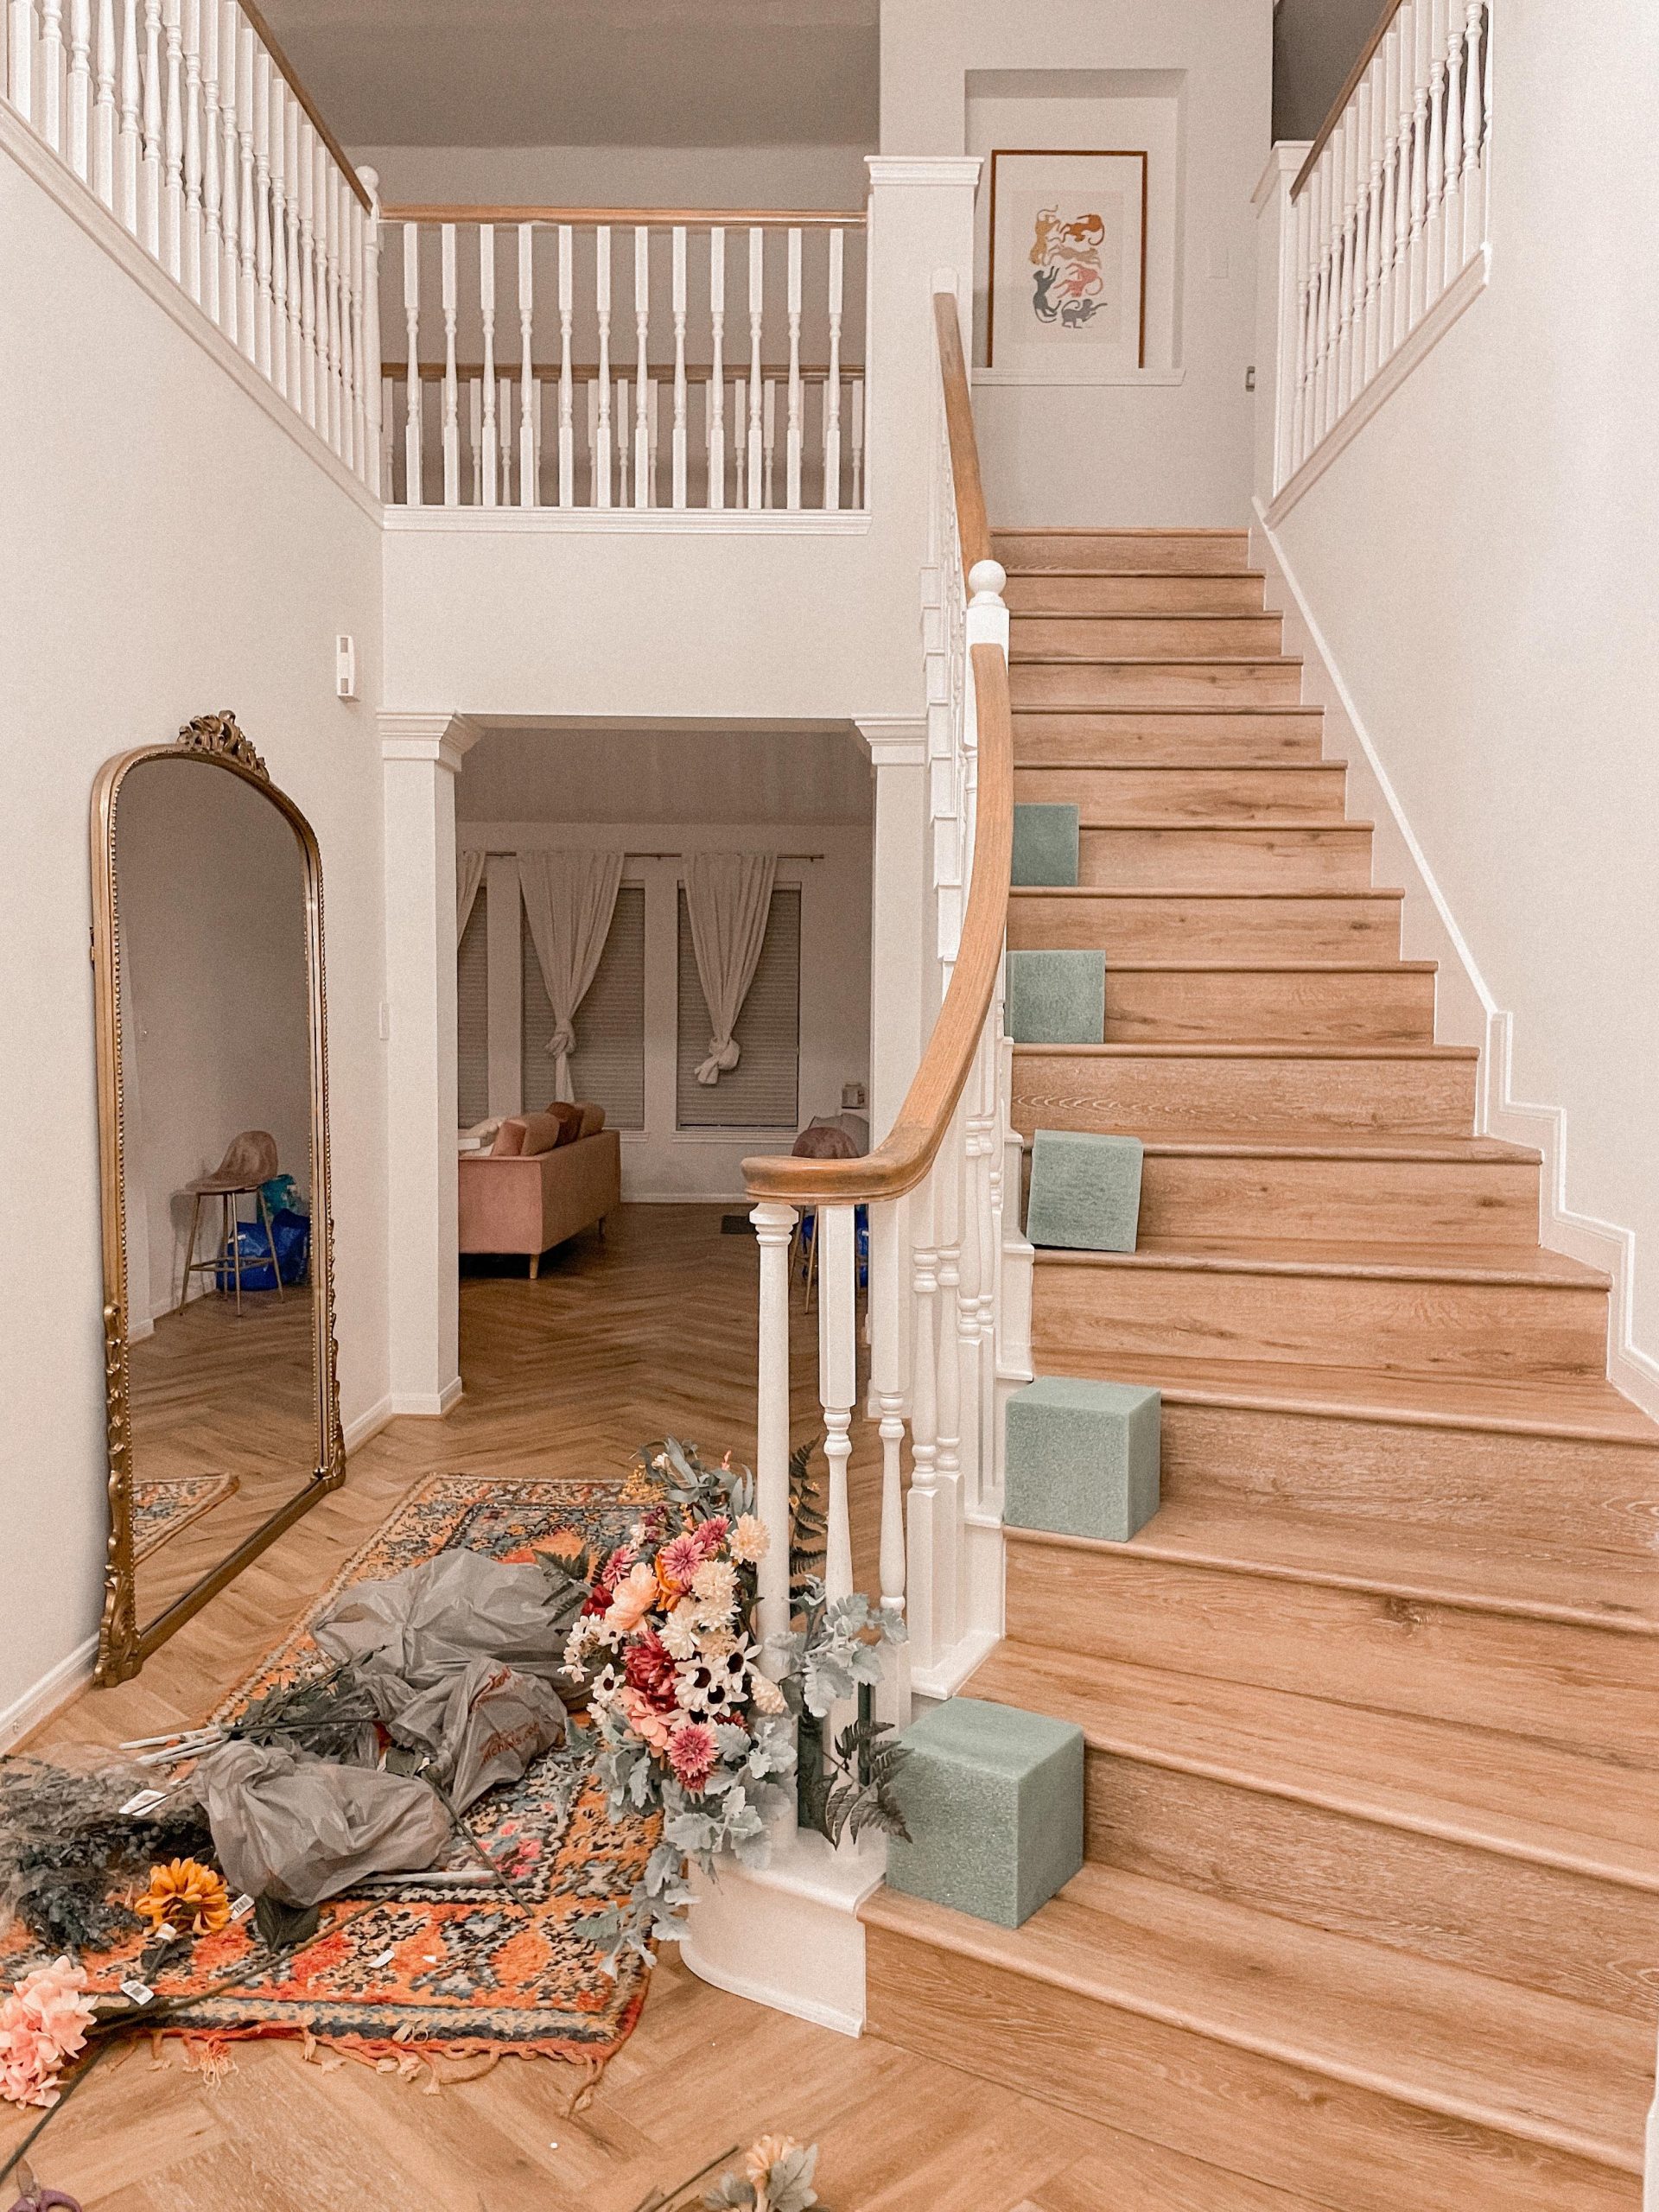
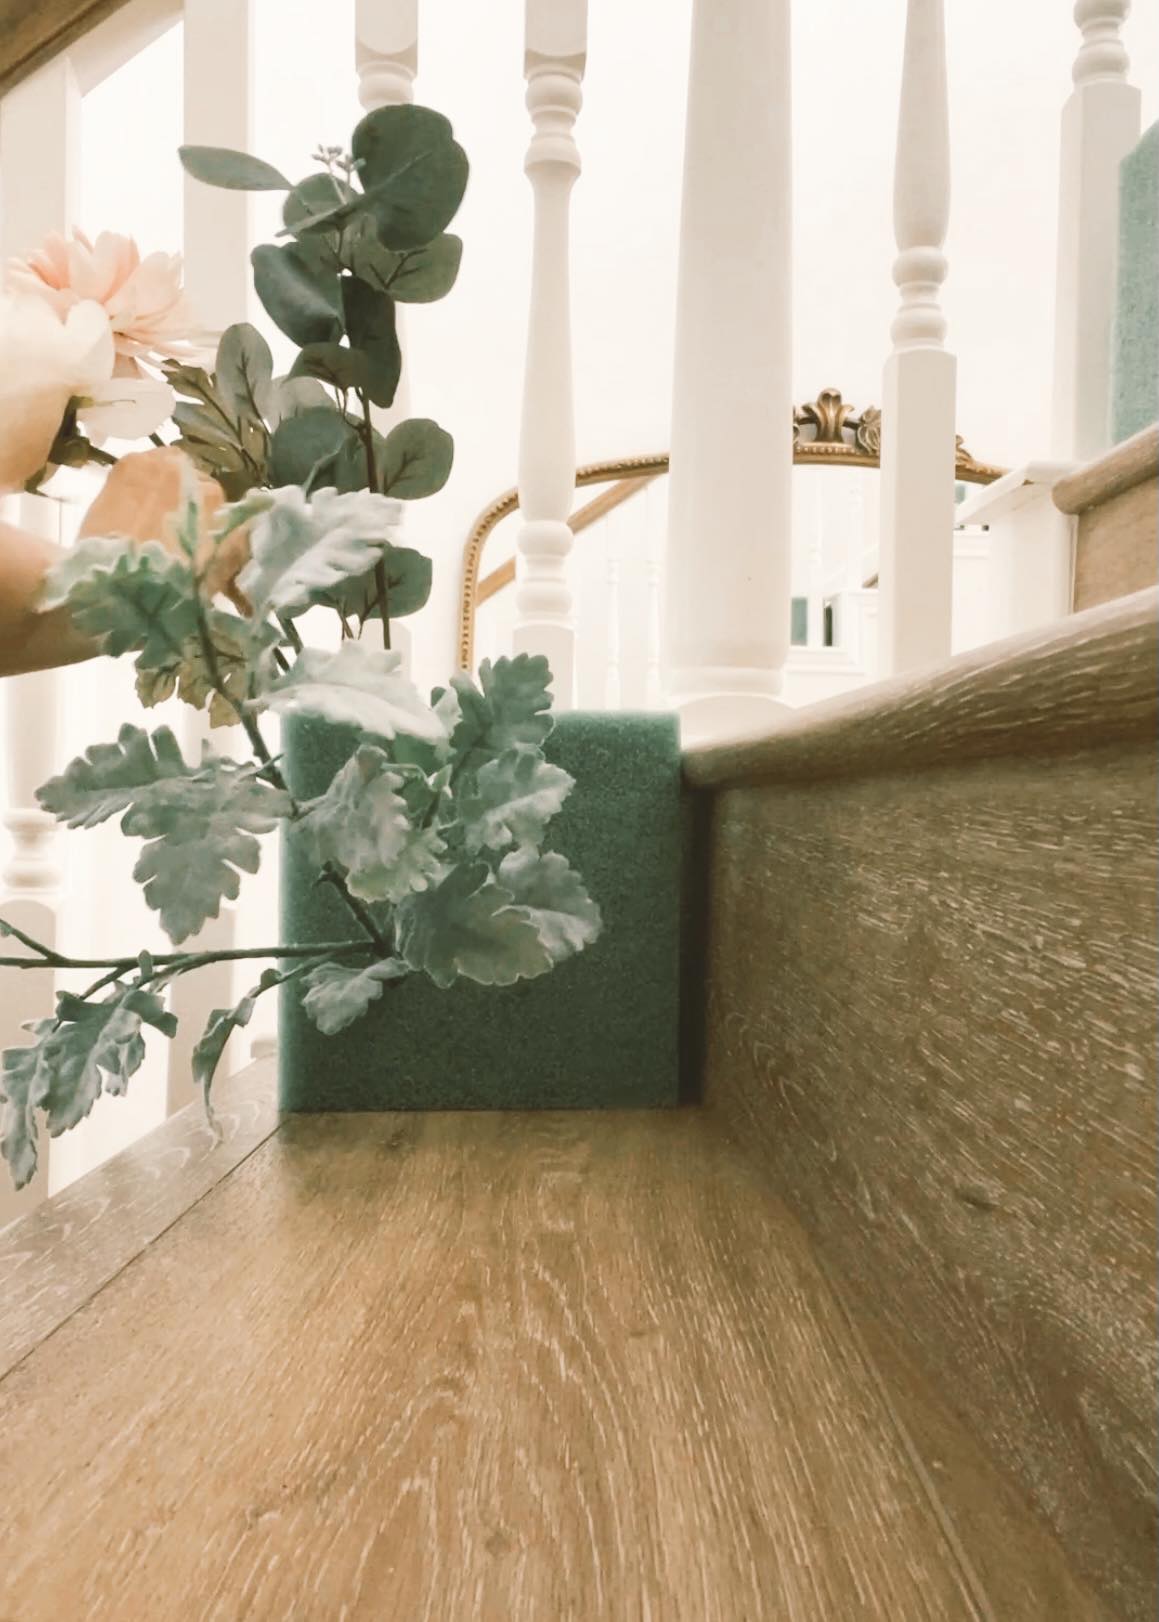
I started off with these floral foam cubes from Michael’s. You can definitely do a smaller size if you don’t want your arrangements to be as big!
Then I picked a color scheme! I wanted the majority of the arrangements to be neutral with some pops of pink and orange! The best part about faux florals is that you can reuse these for different seasons if you just switch out some of the colors to fit the current season! Tip: look for florals that have a wire inside them! It makes it easier when you push them into the floral foam!
I put together all my arrangements on the stairs, which you definitely don’t have to do, but since I only filled the front of the cubes, it helped to see what it’d look like. I would run down the stairs every time I finished an arrangement to make sure you couldn’t see any foam and to see if the design I was doing was moving in the right direction!
You can use wire cutters and scissors to cut the flowers and then push them into the floral foam! This was the most tedious part of the project because it can take a while to get through some of the thicker stems! Also, iff you only put flowers in the front, you may have to put a paperweight on the back to keep it from toppling over!
The end result was SO DREAMY! I still can’t get over the fact that I did this! The total cost of the project was $500. While, it was expensive, I can continue to use these throughout the year and funnily enough, my friend may end up using these for her wedding reception!
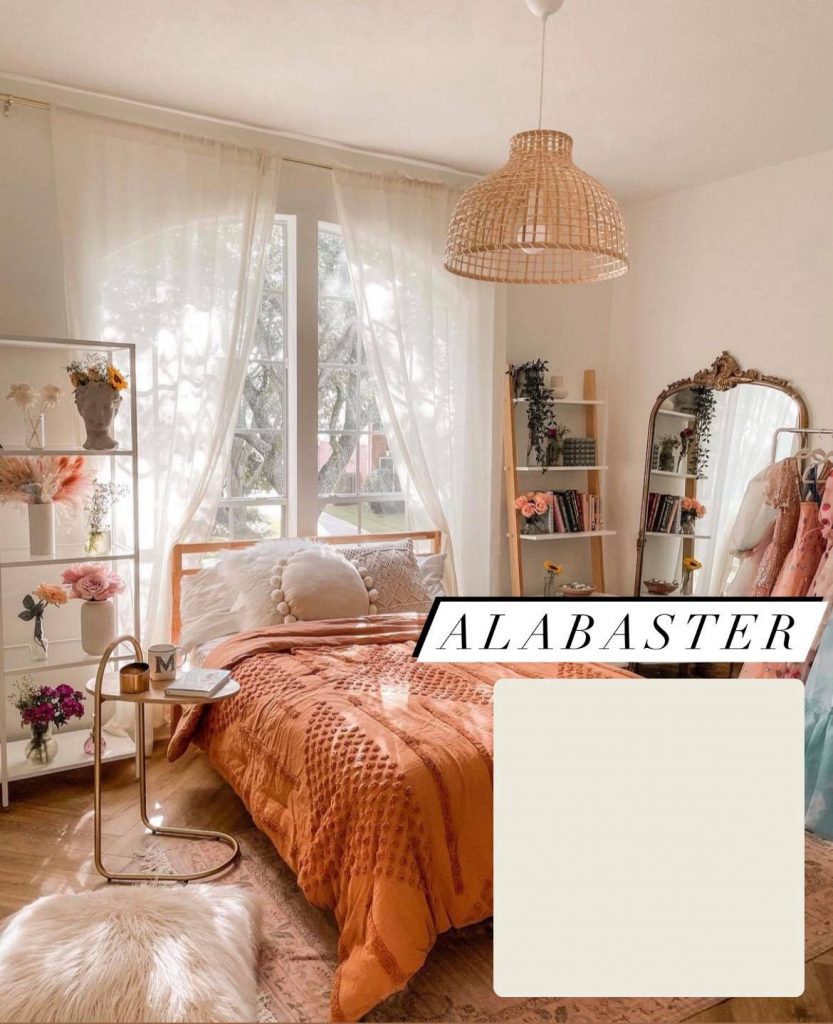
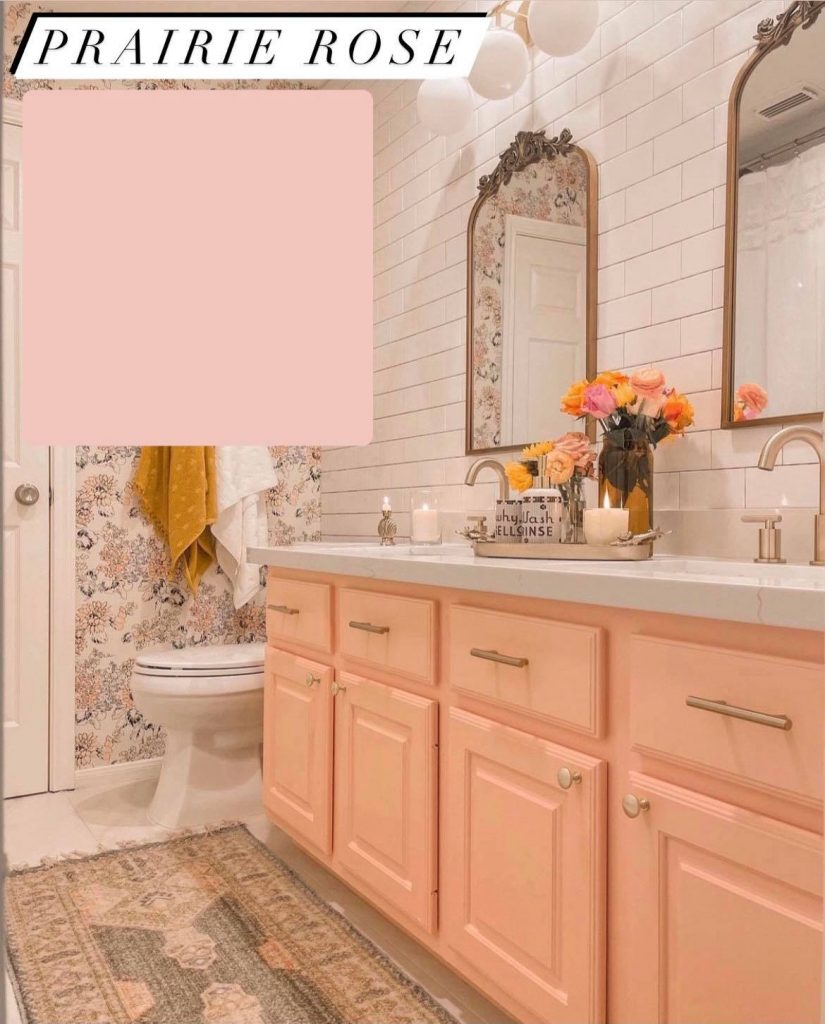
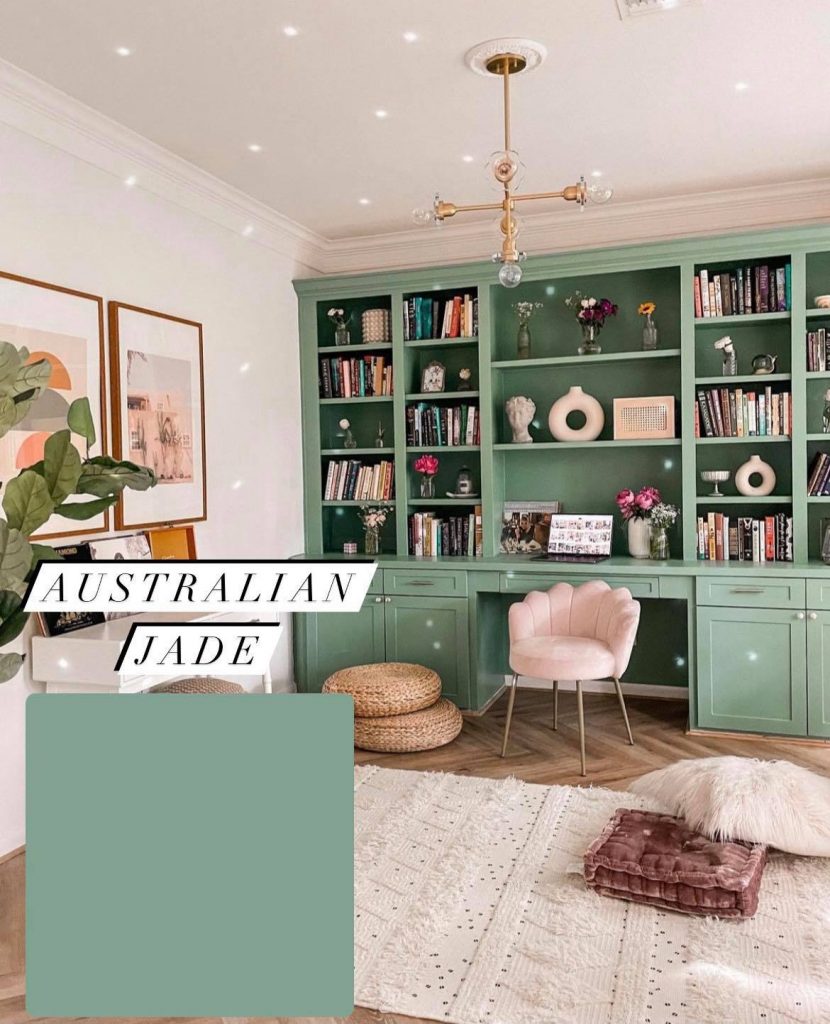
I often get asked what colors I use around the house! Sometimes colors look a bit different once you’ve applied them so I wanted to show y’all the color as well as how it looks in my spaces! I’ve experimented with quite a few pinks, whites, and greens so here are the ones I have really loved and would definitely use again!
Alabaster by Sherwin Williams was their 2016 color of the year and I saw it in a bunch of different houses and really liked it! I tend to do a white base and then add in pops of color so this color was perfect for the majority of our home!I have used Prairie Rose by BEHR a few times! It’s a warm pink that really pops!Australian Jade by BEHR is one of the best colors I’ve ever tried! It’s a deep green that looks refined and is really trendy right now!Azalea Leaf by BEHR is a lighter green shade. It also gives off a very calm vibe and looks great on a vanity!
This post is sponsored by Rocket Mortgage® and reflects my personal thoughts and opinions.
Last December, I had just given birth to our baby girl, we were mid-pandemic and I was incredibly busy with projects. I swore I wouldn’t add anything else to my plate, but my husband was casually looking at homes closer to my parents for me and in late December said he had found the PERFECT home for us! I almost told him we should just skip going to see it and wait to buy when things calmed down, but he insisted it was the right home for us. We went to see it and I immediately knew it was the one! We put in an offer almost immediately after. The design of the home was so not us, but I could imagine what it could become and saw a lot of potential in it to be the perfect home for us to raise a family in!
Here are a few before and after photos of our home!
Before
After
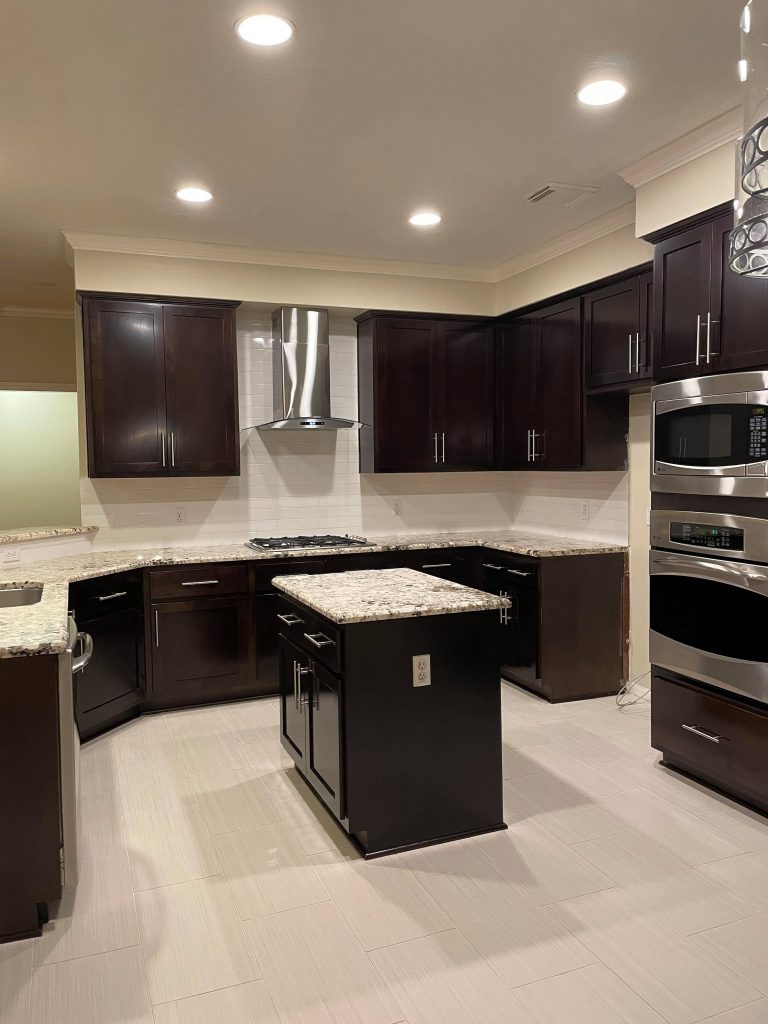
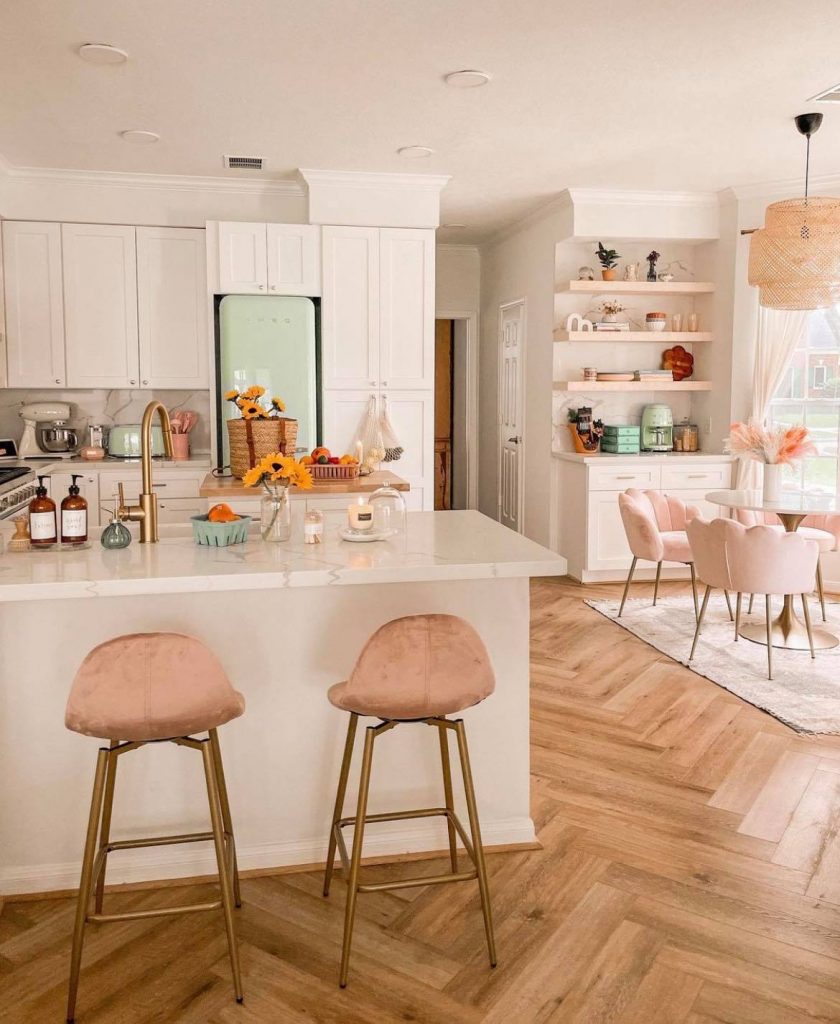
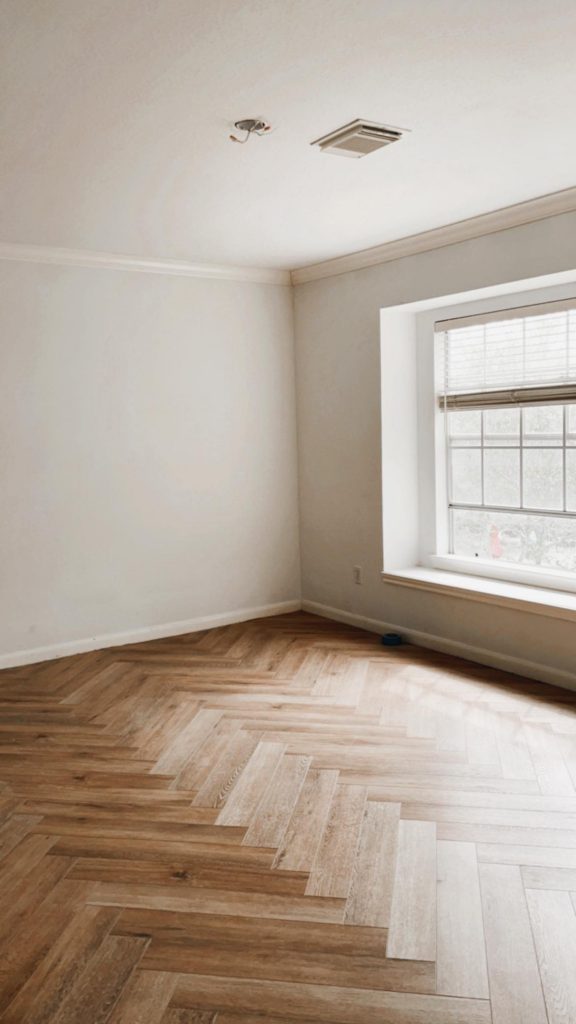
I decided to change out the flooring to a herringbone luxury vinyl plank pattern. We majorly reconfigured the appliances and switched out the silver sink, replacing it with a white farmhouse sink and gold hardware. One of the last major changes was switching out the dark brown cabinets for white!
Before
After
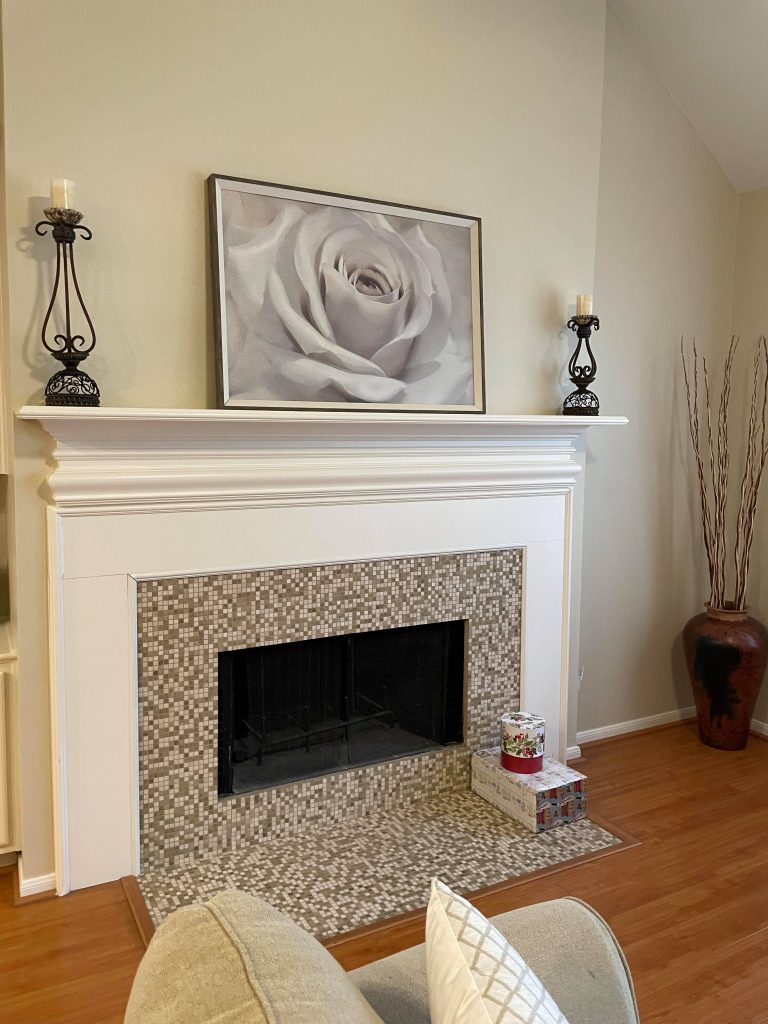
I really didn’t like the tile on this mantel and wanted something with a more classic/vintage vibe. I found this amazing statement mantel being sold secondhand and knew it would make a big impact! You might also notice the walls are way less beige – we repainted the entire house white!
Before
After
Here, we switched out the flooring, took off the chair rail and added a beautiful chandelier!
One of the biggest comments I get about our home buying journey and remodel process is, “I can’t believe how fast you transformed your home!” While the remodeling process was very quick, the other parts of the home buying process was long. Since my husband and I weren’t planning on buying a home when we did, we were very unprepared. Something I would highly suggest before looking for a home is determining a budget you feel comfortable with and looking into a mortgage partner who can help you understand your home loan options! I wish I knew about Rocket Mortgage® because they really help make the home buying process easier. They have an Online Learning Center, to arm you with as much information as needed throughout the process. They provide you personalized loan options based on your budget and situation. You can even access your mortgage information at your fingertips via their app, so it’s really convenient when you need to reference the documents at any given time. They are there to help you every step of the way.
We did an interview with them on our home buying process and gave a tour of our completed projects and one we’re still working on, which you can watch below!
We were super lucky to purchase right before the housing market went crazy! If you’re looking to buy a home soon, you should definitely see how Rocket Mortgage ® can help you during your home buying journey!
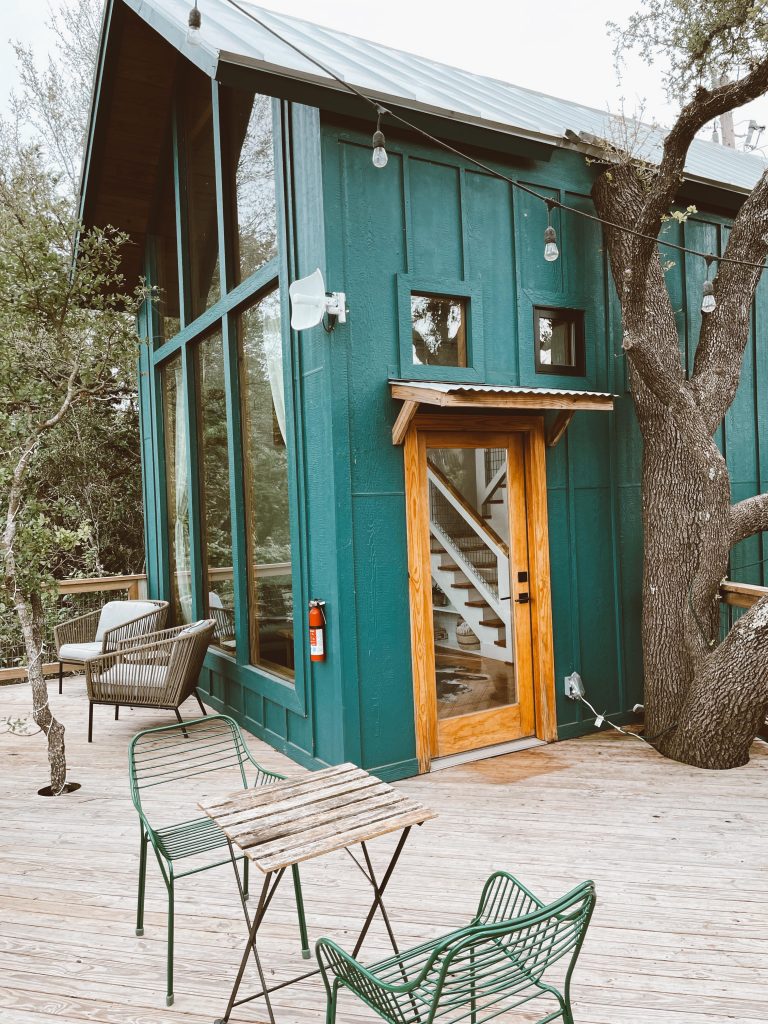
On a whim, I decided to look up AirBnb cabins in the Texas Hill Country and I came upon a collection of tiny home cabins that were built and designed by a husband and wife duo! The views are incredible and they have thought of every single thing you could think of that could make a stay more enjoyable!
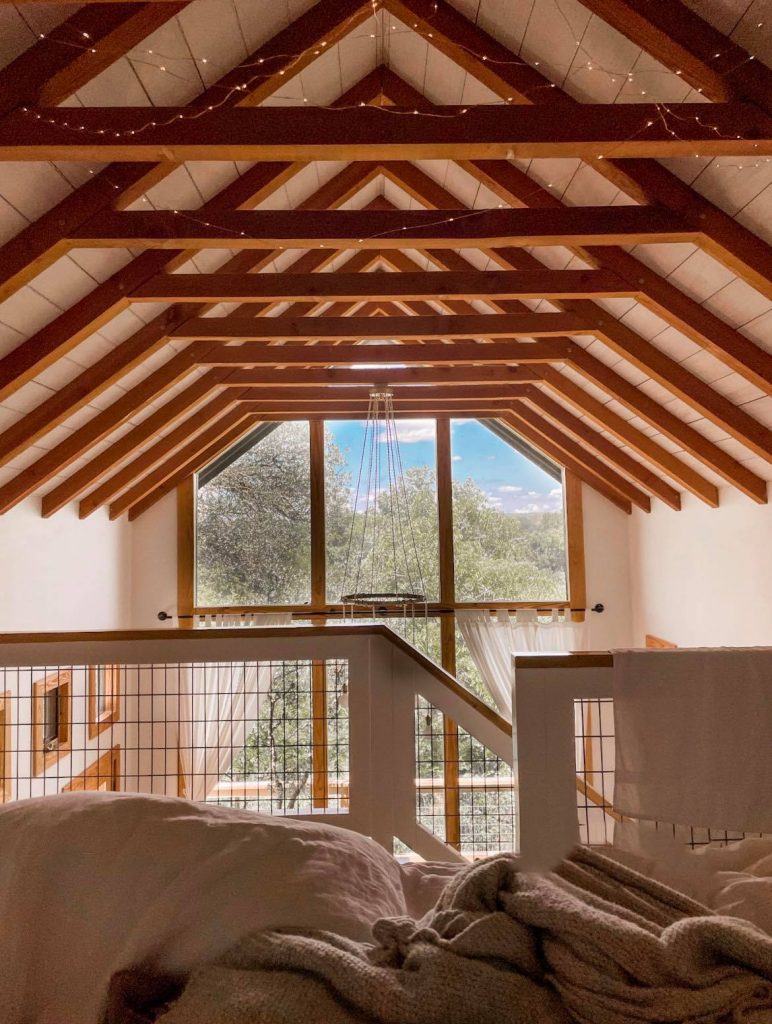
The collection of cabins is called Honey Tree Farms and it’s located in Fredricksburg, TX. They all have different designs and features that make them fun to stay at. The cabin we were in had a loft bedroom with a breathtaking view as well as twinkle lights everywhere to give it a cozy feeling. Some of the amenities other cabins have that I loved were hot tubs and hobbit-style reading nooks.
The specific cabin we stayed at was called the Sycamore. It was on the lower end pricewise for Honey Tree Farms, but was perfect for 2 adults and 1 baby!
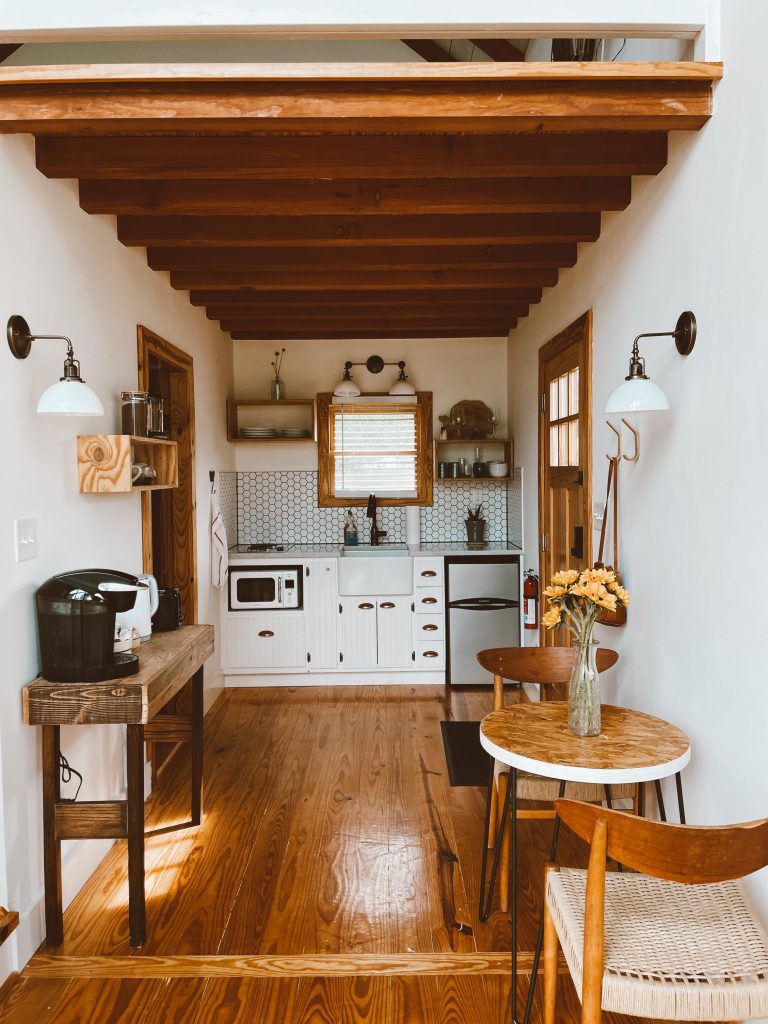
There was a kitchen that had a stove, microwave, mini fridge, coffee bar, and kettle. The design was beautiful and it was super functional!
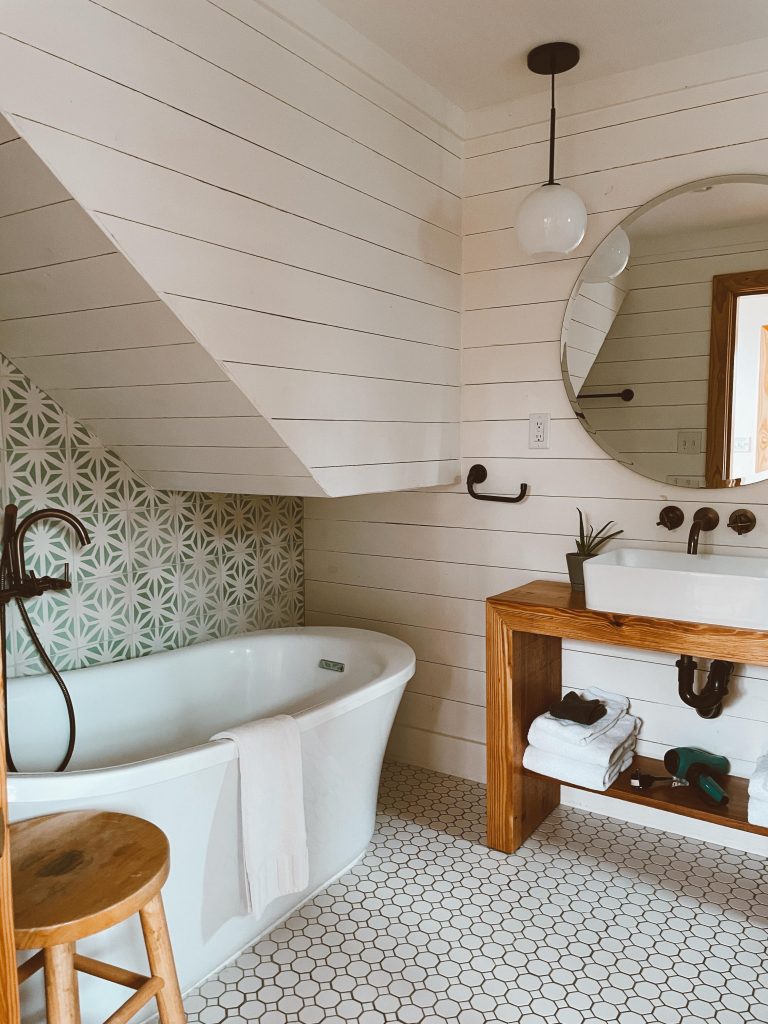
There was a bath and shower which was nice because we have a baby so it was SUPER convenient having a tub for her to bathe in!
The deck had ample seating, a calming view of a small brook, a hammock to lounge in, and a grill!
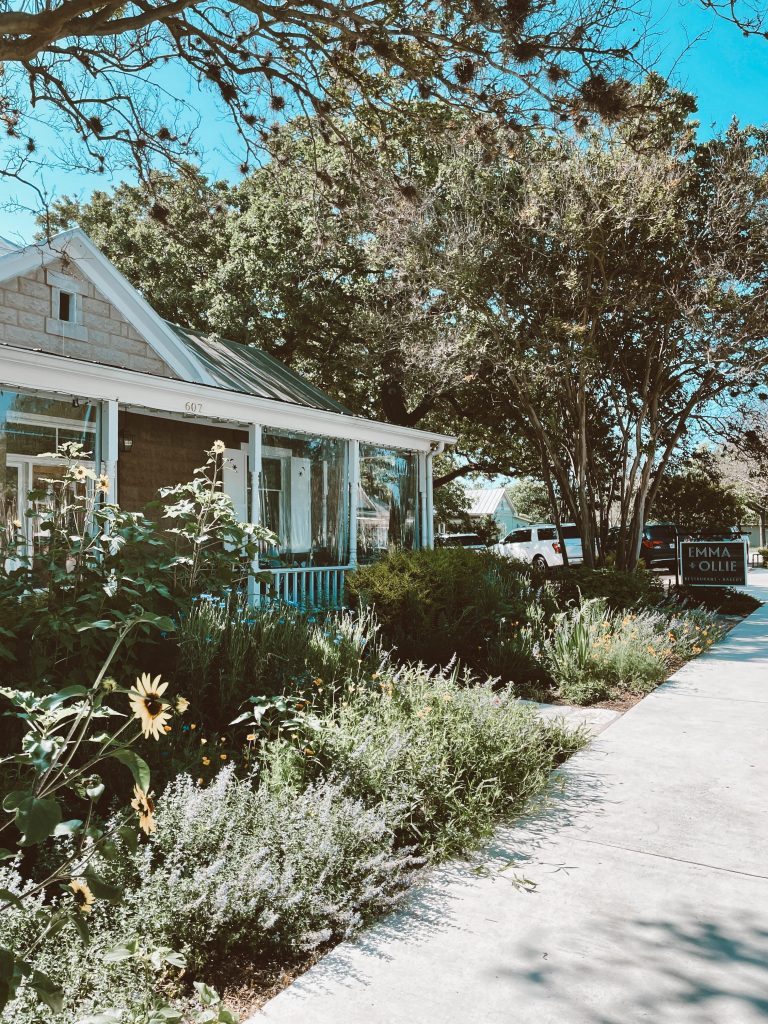
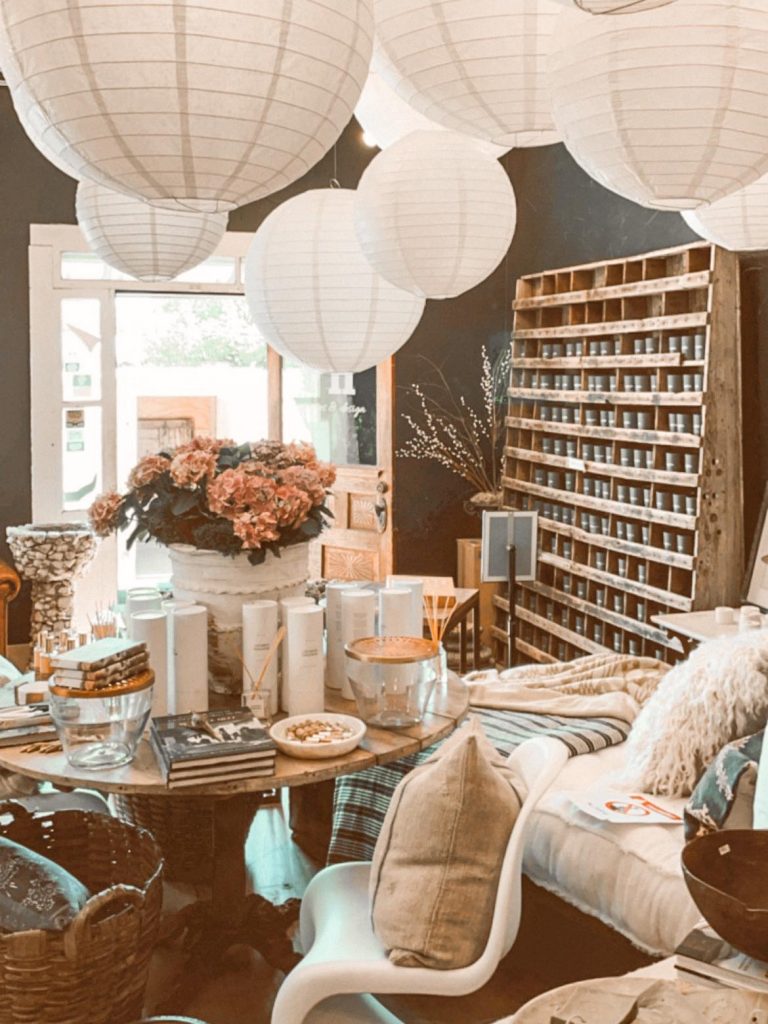
Fredricksburg is a small town, but there is so much to do! Wineries, flower farms, good food, antique shops, and more! If you do end up visiting, our host recommended Emma + Oillie, Otto’s, and Frisch Juicerie for food and drinks! He also recommended Farm Haus, an antique store, that I absolutely fell in love with!
The other cabins are called Acorn, Leaf, Sapling, and Live Oak! If you are thinking of booking something immediate, be sure to book asap! Most of the cabins are filled up into next year with 2-3 day availabilities sporadically left. Occasionally people will cancel their reservations and they’ll post the availability on their Instagram @honeytreefrg. They are also constantly working on new cabins so follow them to be alerted when a new one opens! My husband and I loved our stay and are already planning on coming back again to experience a different cabin!
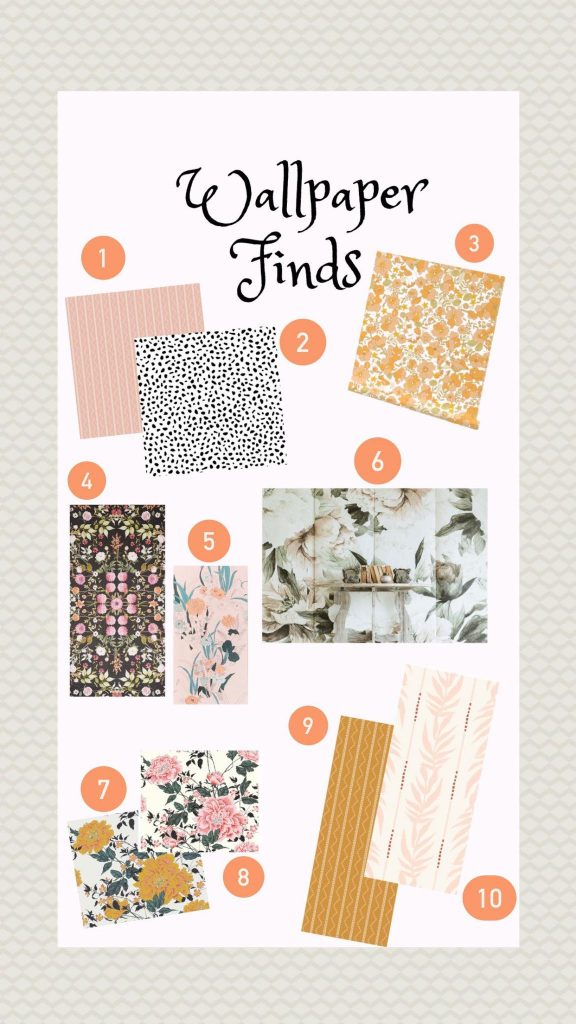
Wallpaper has become one of my favorite ways to make walls look more interesting and to create a focal point! I have used regular wallpaper as well as removable! If you’re renting, I would definitely recommend removable wallpaper to decorate!
Vinyl vs. Hardwood and Herringbone Flooring Details!
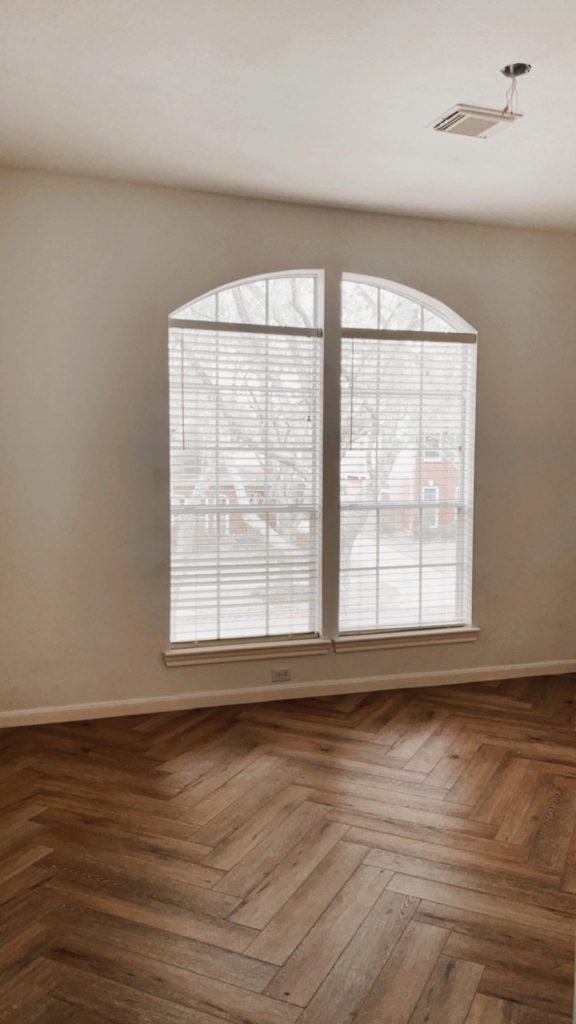
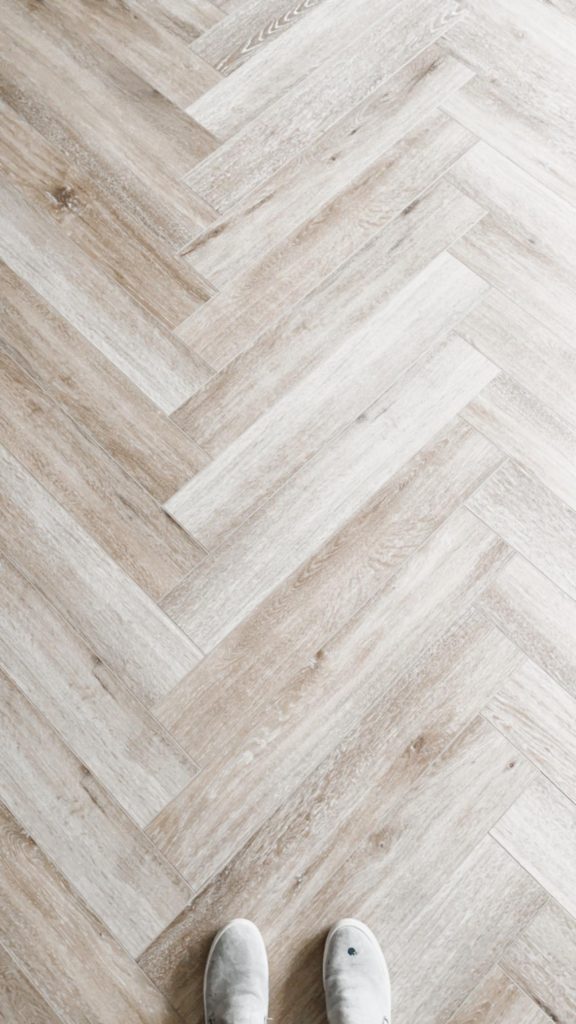
One of the biggest trends I have been seeing lately is beautiful, herringbone hardwood flooring! As we were working on the budget for renovating our home, I considered it and had our contract give us an estimate and y’all it is EXPENSIVE! Our alternative plan was to find a herringbone vinyl flooring. I actually wasn’t able to find one I loved when I google searched herringbone wood floors, but our contractor showed us a few he had in mind and we liked one of them!
Pros of Vinyl Flooring
We went with the Innova Howell Mountain Herringbone Vinyl Flooring. We had heard that vinyl flooring was a little softer than hardwood, which would be nice since Summer is learning to walk and we didn’t want her to constantly be falling on really hard hardwood flooring AND hardwood can be difficult to maintain. The vinyl flooring is also waterproof which is a BIG plus!
Color and Size
The hardest part about picking out the flooring was getting the exact look we wanted. I do not like the look of big planks of wood in the herringbone style and I also don’t like wood that looks too gray. It’s always nice to see what a whole room of it looks like as opposed to the samples they show you. The photo below makes the wood look way lighter than it actually is, but I wanted to give y’all a reference for how wide the planks look.
Cost and Overall Thoughts
A lot of different retailers sell this flooring so I would shop around to get a good quote for it! We ended up spending about $3.29 per square foot and that does not include the labor. When it was installed, it did seem a little darker than the photo examples online, but I did end up really loving it!
This post is sponsored by HGTV HOME by Sherwin-Williams and reflects my personal thoughts and opinions.
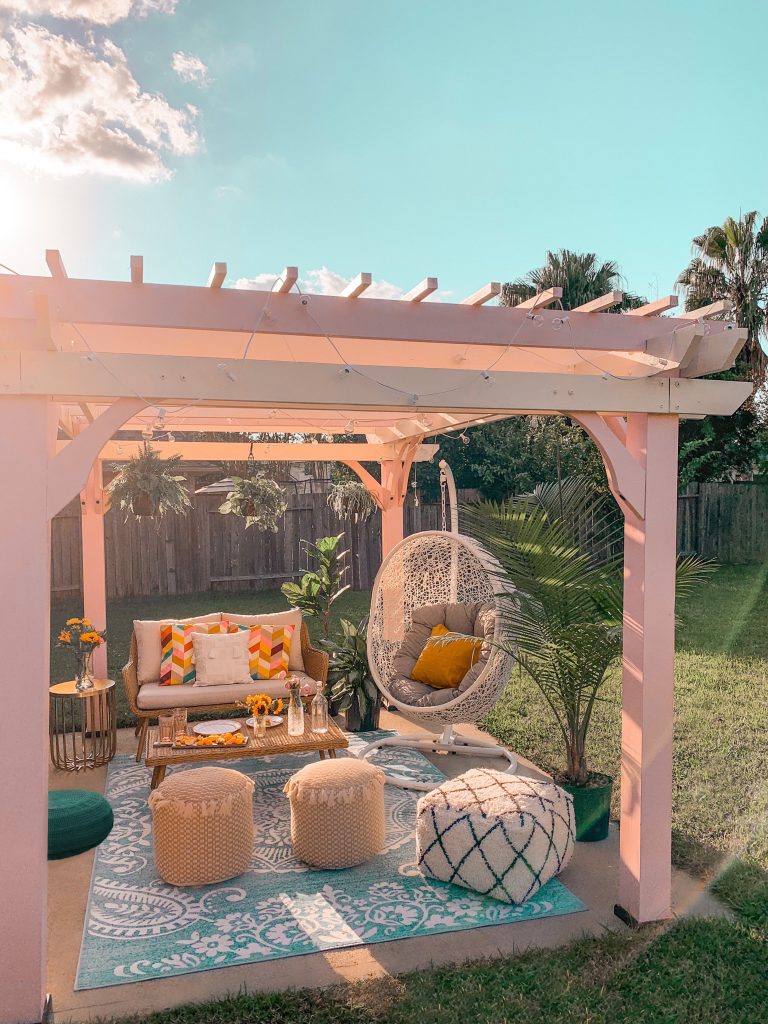
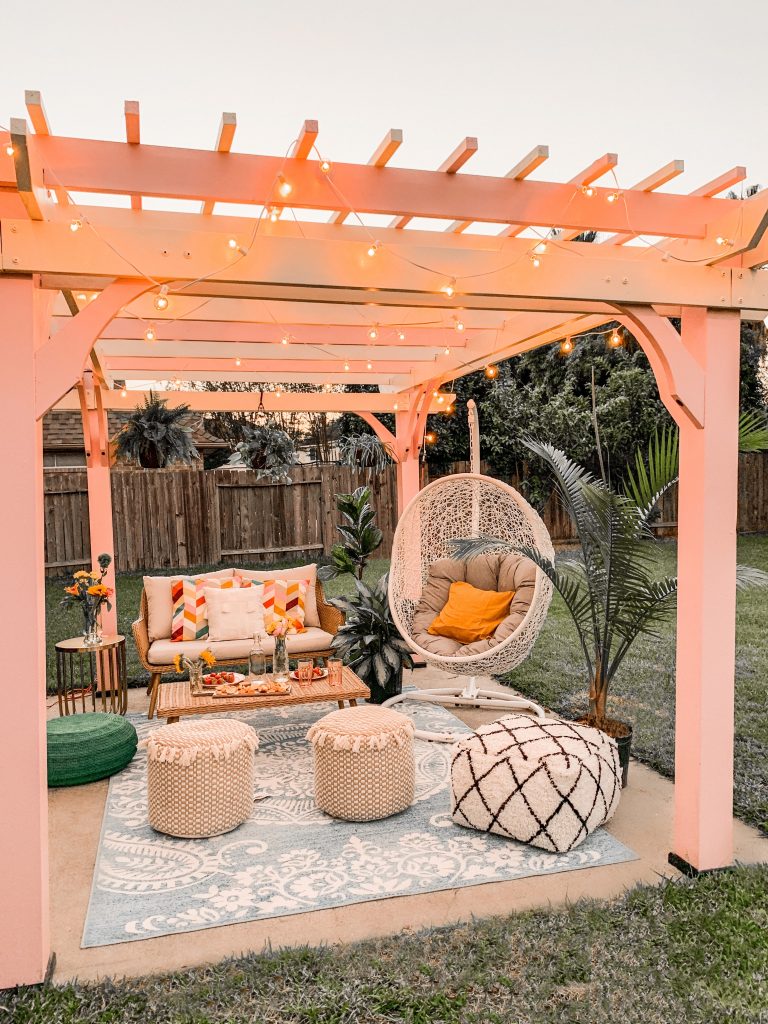
Whenever I think of a dream space it always has to include a little pink and this pergola was no exception! If you’ve followed along for a while, you know I’ve been very into painting and finding the right color combos. I went to Lowe’s Home Improvement and found a huge display of Color Collections from HGTV HOME® by Sherwin-Williams(the collections are exclusively available at Lowe’s). I usually will spend up to an hour staring at paint colors to get the right colors to compliment each other so the Color Collections were helpful as I was trying to create a vision in my mind of what I wanted. I ended up going with the Vintage Finds Color Collection because I just loved the overall vibe of the colors!
So the next big part was ordering a pergola. I got a pergola kit, which has all the parts you need to build your own. I didn’t want the pergola to be just pink(the name of the color I picked is called Lotus Flower) so I chose a really beautiful cream color called Choice Cream to compliment it. Whenever I paint, two things I look for is that it has a primer in it already and that it’s one-coat coverage. This saves so much time because you’re not having to do extra steps and you don’t need to spend extra time painting over and over. The type of paint I picked was the HGTV HOME®by Sherwin-Williams Everlast Exterior Paint & Primer. Another benefit to this paint is that it uses Water Beading Technology to prevent moisture damage because after doing all that painting, you’re not going to want it to get damaged!
So I was actually shocked that it only took a gallon of each color to complete the entire pergola. I painted the pieces before assembling and friends, let me tell you there were A LOT of pieces. Something to keep in mind is the ideal temperatures to use this paint is between 35°F and 90°F. I painted at 70°F at nighttime and 85°F during the day and it seemed like the paint dried faster at 85°F.
The hardest part about this project was definitely the assembly. When put together a lot of the pieces were very heavy. This took about 8 hours to assemble, but the result was well worth it!
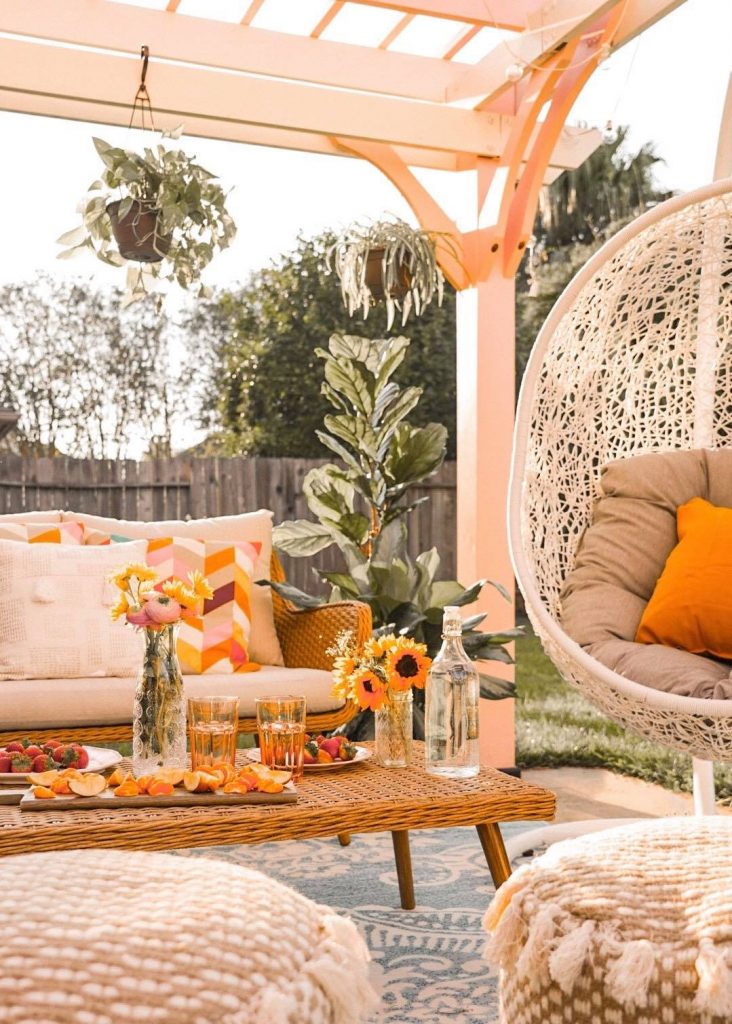
Here’s how the pergola turned out! When I was picking out furniture, I used the Vintage Finds Color Collection to find items that fit within the color scheme I wanted. I used colors like Blue Nile, Refresh, Tailpot, Frolic, and Softer Tan to compliment the Lotus Flower and Choice Cream.
After I laid out the furniture, it felt like something was missing and I realized there was just too much empty space at the top and corners of the pergola. I picked up some plants and just arranged them in those spots to create a more decorated look!
Last, but not least, I strung string lights at the top of the pergola to give the space a warm feel. This is what the lights look like when they’re on at night and it completely transforms the space to feel super cozy!
This was probably the biggest project I’ve ever attempted. I went out of my comfort zone and tried some bolder color combinations and am so happy with how it turned out! Feel free to drop any questions you have about the pergola below!
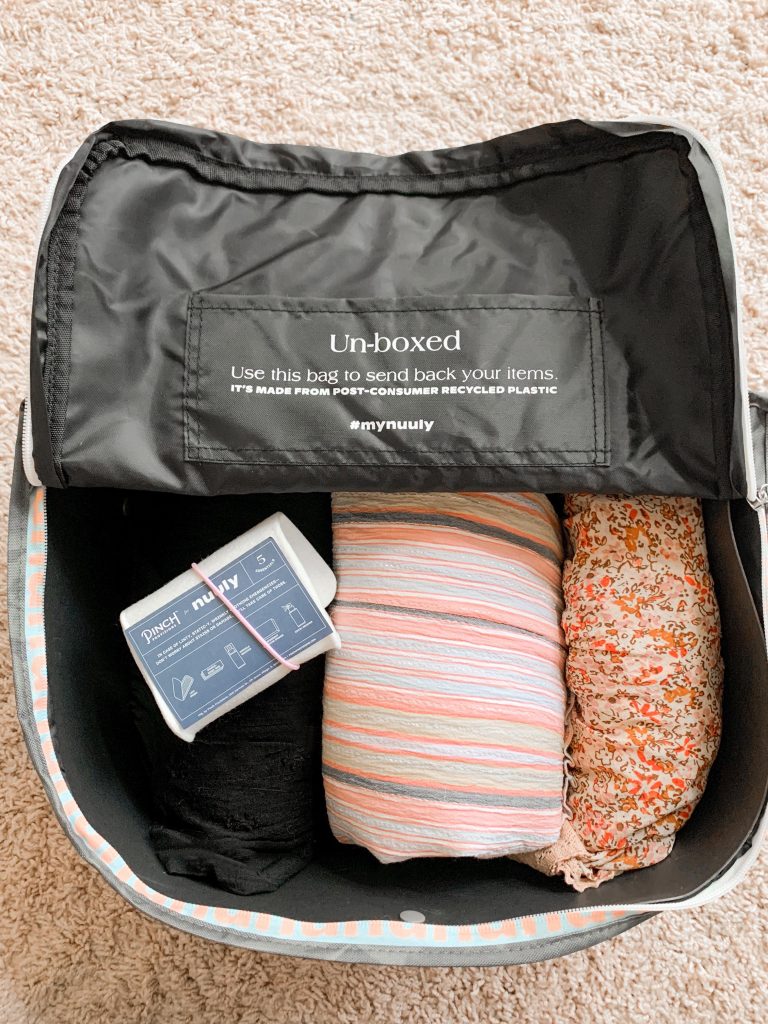
I love change and one of the biggest things I like to change constantly is my closet. I am always excited to try new styles and after seeing a few of my instafriends try Nuuly(check out Reagan’s outfits from @peruseproject!), I thought I’d give it a try. There are other clothing rental services like Rent the Runway and Le Tote, but Nuuly fit my price point and had brands that I really like (Anthropologie, Free People, they even have a vintage section!).
So here’s how it works. You pay $89 a month and pick 6 items for that month. After the month is over, return the clothes and they’ll dry clean them for you! I used a referral code to get $10 off my first month. I’ll link mine HERE just in case you’re thinking of trying it. So without further ado, here’s the try on of all the items I picked up!
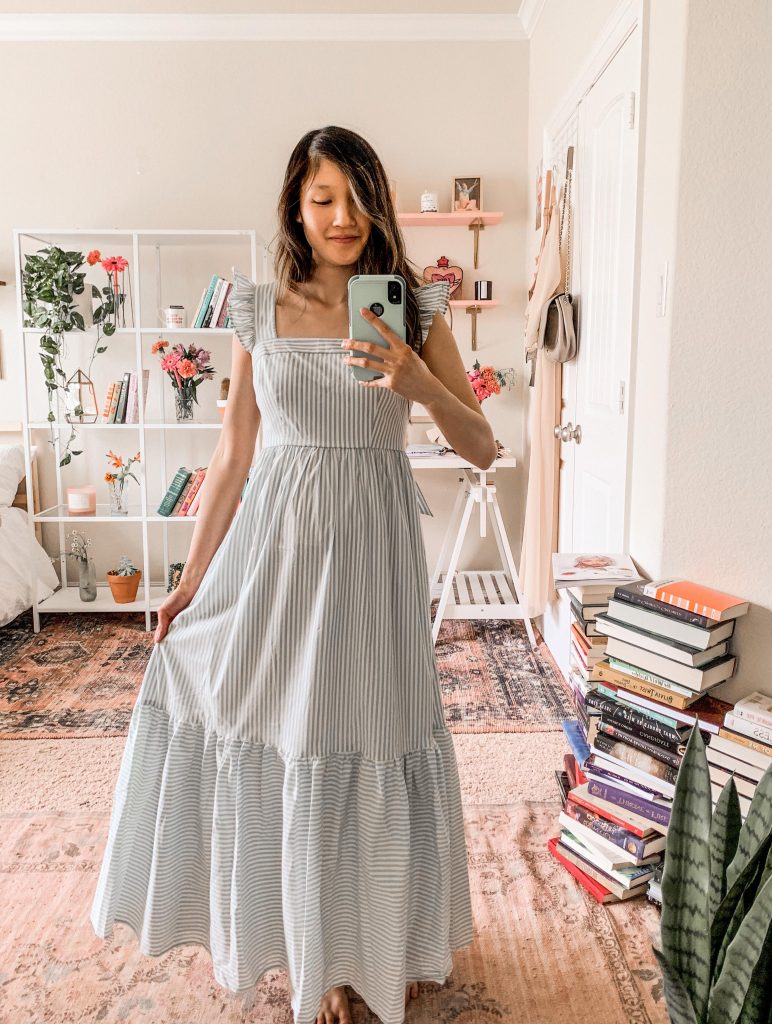
Ariana Maxi Dress: Steele: $289 I’ve been wearing dresses more often now that I’m pregnant. This dress is a stunner and the fit is great if you’re petite. I can’t wait to wear this one out!Candy Striped Maxi Dress: Gal Meets Glam: $198 This dress just gives me all the spring feels!Lola Kimono: Free People: $98 Excuse the hole in my shirt! I really like this piece! It’s an easy way to dress up jeans and a tee.Lina Lace Top: Free People: $118 I LOVE this top! I can definitely see myself wearing it out a ton because of how comfy and cute it is.Can’t Help It Mini: Free People: $138 I loved the flowy nature of this dress and will probably wear it to a nice dinner.Show Some Shoulder Tie Dye Crop Top: La Ven: $70 I actually didn’t know this was a crop top! Being 5 months pregnant, I personally wanted items that were a little more comfortable to wear, but it actually ended up being one of my favorite pieces I picked out.
After, getting my first set of items and trying them on, I’ve decided to continue the subscription because I just loved all of the pieces. A lot of them are things that I wouldn’t necessarily buy for myself because they’re higher end brands so I’m really excited to wear them. I have a ton of big events(weddings, bachelorettes, etc.) coming up and personally I think in the long run the price will be worth the wear I get out of these items!
Here are a few tips if you decide to try Nuuly.
Look at the reviews and real-life pictures. Those were the most helpful in figuring out if the piece would be the right fit for me and look flattering.
Nuuly has some FABULOUS dresses that are extravagant and beautiful! It’s easy to immediately zone in on those, but do a mix of maybe two of those dresses and other pieces you would actually wear out so that you actually end up wearing the pieces and they don’t just sit in your closet.
Items get rented quickly. Your size could go out of stock if you don’t check out the same day you put it in your cart. Save the items you like to your closet and when they are returned, you can pick them up the next month. There is such a huge selection though that it’s not really an issue.
Lastly, I thought I’d mention Nuuly’s commitment to sustainability! I was happy to see that Nuuly ships its items in a bag made out of post-consumer recycled plastic, which I thought was super cool.
This post is sponsored by National Hardware, but reflects my personal opinions.
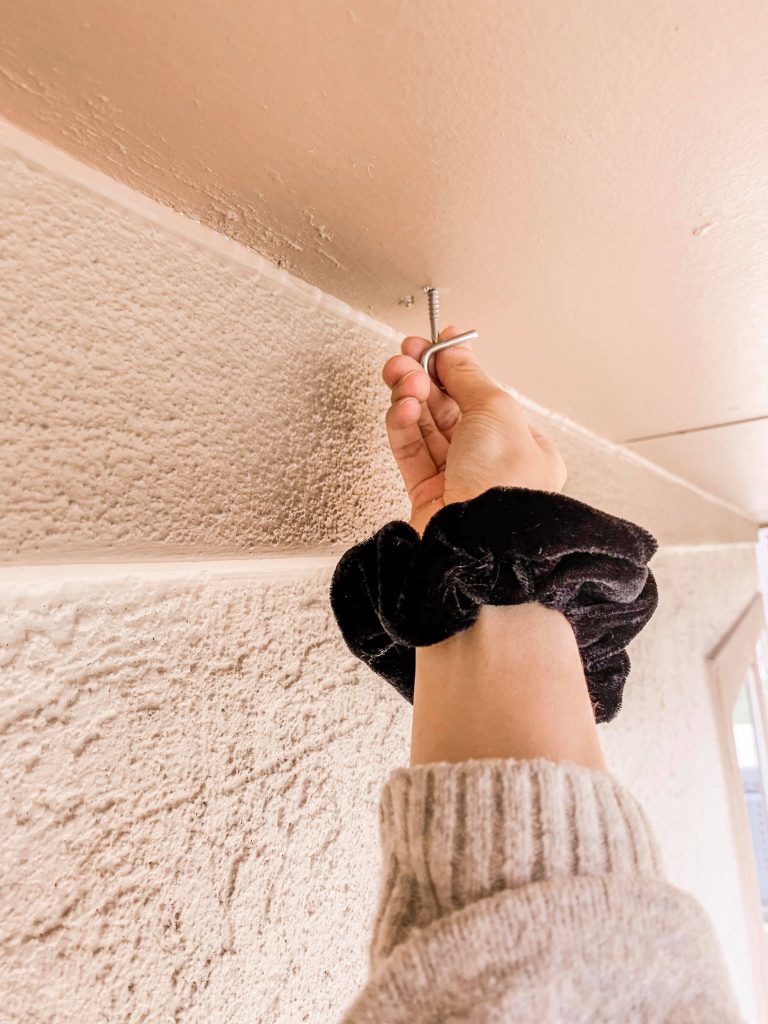
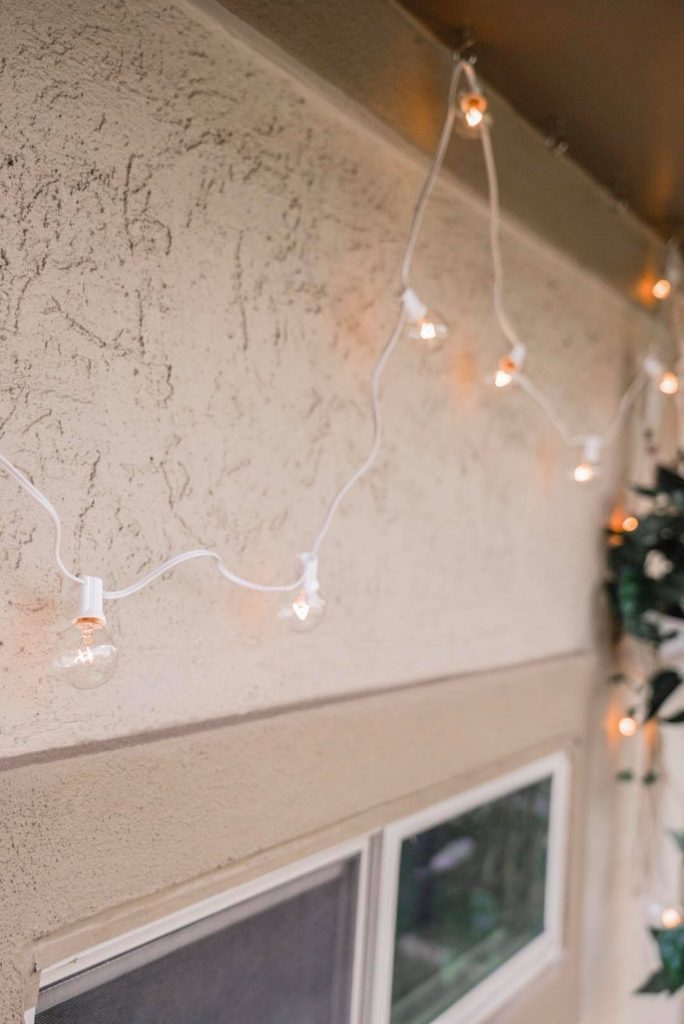
Can I tell y’all a little secret? This project scared me! I have been wanting to hang some outdoor bistro lights, but I’ve been putting it off because it seemed like a lot of work, HOWEVER, after eating some ramen, doing the dishes, and trying to find any other excuse to put it off, I got to work.
Gathering the materials was pretty easy, since National Hardware sent me a Bistro Light Kit that included their new hardware line Placement™, which included Q Hangers. I took my Q Hangers, got on my ladder, and drilled small holes where I wanted the Q Hangers to go. After that, it was SUPER EASY to twist the Q Hangers in by hand. This next part is a little embarrassing, but I took my q hangers, got on my ladder, and tried to screw them in with my hands. This did not work whatsoever. So after thinking about it for a bit, I got my drill and drilled small holes where I wanted the q hangers to go. After that, it was SUPER EASY to twist the q hangers in by hand.
Next, I took the lights and started threading them through the q hanger. WhWhat’s great about these hangers is that you can easily take the lights out if you want to change them out for a different set or hang something else from them. They are also made of stainless steel, so I don’t need to be worried about them rusting outside.
These lights they sent were purchased from Amazon, and came with two extra bulbs in case some of yours go out. Also, if one does go out, the rest of the lights will still work, you just need to replace them!
This is my happy place! I’m so excited to spend nights out here, reading books and drinking apple cider! The lights make everything feel so cozy and it really only took me 30 minutes to finish!


